Siskin Ghost Theme Documentation
Welcome to the Siskin Ghost Podcast Theme documentation by Iris Themes.
If you’re having an issue and can’t find the answer here, please contact us, and we will try to answer as soon as possible.
If you have an idea or a suggestion, feel free to suggest any new features you may want in this theme. We will consider adding them to the following updates. Once you purchase this theme, you can access all upcoming theme updates.
Please note that some parts of the theme have been improved, so the video is not up to date with the theme. We added new features and possibilities to the theme, like a new way of adding a Benefits section and About Me content.
Theme Info
Theme Name: Siskin
Theme Developer: Iris Themes
Version: 2.0.0
Description: Ghost Podcast Theme
Latest update: 31st January 2026
Requirements
Ghost version: 5.0.0 or higher
Ghost Content API: v5
How do I install the Siskin Ghost theme?
- Make sure that you are logged into your publication at yourawesomeblog.com/ghost/signin
- Go to Settings → Design
- Under Change Theme, click Upload theme
- Click inside the upload box to select a siskin.zip, or drag and drop the siskin.zip into the upload box.
- If you want to activate the theme immediately, click Activate Now or Close if you will do it later.
- Make sure that you are logged into your publication at yourawesomeblog.com/ghost/signin
- Make sure that the Siskin theme is installed and activated
- Go to Settings → Design, and here you will find Home Page options
Setting up the Home page
If you want to have an exact setup like on the Siskin demo page, you need to do the following:
- Please create a page named Home and assign a Home page template to it
- Create tags called Podcast and Blog
- Please create a page called Podcast and give a Podcast page template to it
- Please create a page called Blog and give Blog page template to it
- Make sure that you have exact routes.yaml like
The home page contains several sections:
- Featured Section - This is where your hero area is displayed
- Learn Section - This is where the box with three benefits is displayed
- Podcast section - This is where featured podcast episodes are displayed
- About me Section - This is where the About me area is displayed
- Blog section - This is where featured blog posts are displayed
- Newsletter section - This is where the newsletter form is displayed
Editing Home page
- To edit the Featured area image (Hero image), go to Settings → Design → Brand and change the Publication cover.
- To edit the Featured section text and titles, go to Settings → Design → Homepage" and look for the featured section set of options.
- To edit featured images that are located before the main action button, you need to go to [siskin/partials/featured-in.hbs] and change the following code:
<div class="grid mt-4 w-50" data-cols="3" data-gap="3">
    <div class="grid-image-item"><img src="{{asset "img/featured-1.svg"}}" alt="Top 50" /></div>
    <div class="grid-image-item"><img src="{{asset "img/featured-2.svg"}}" alt="Top 10" /></div>
    <div class="grid-image-item"><img src="{{asset "img/featured-3.svg"}}" alt="Top 5" /></div>
</div>
You can upload your images into /img folder and replace "featured-1.hbs..." images.
Benefits section
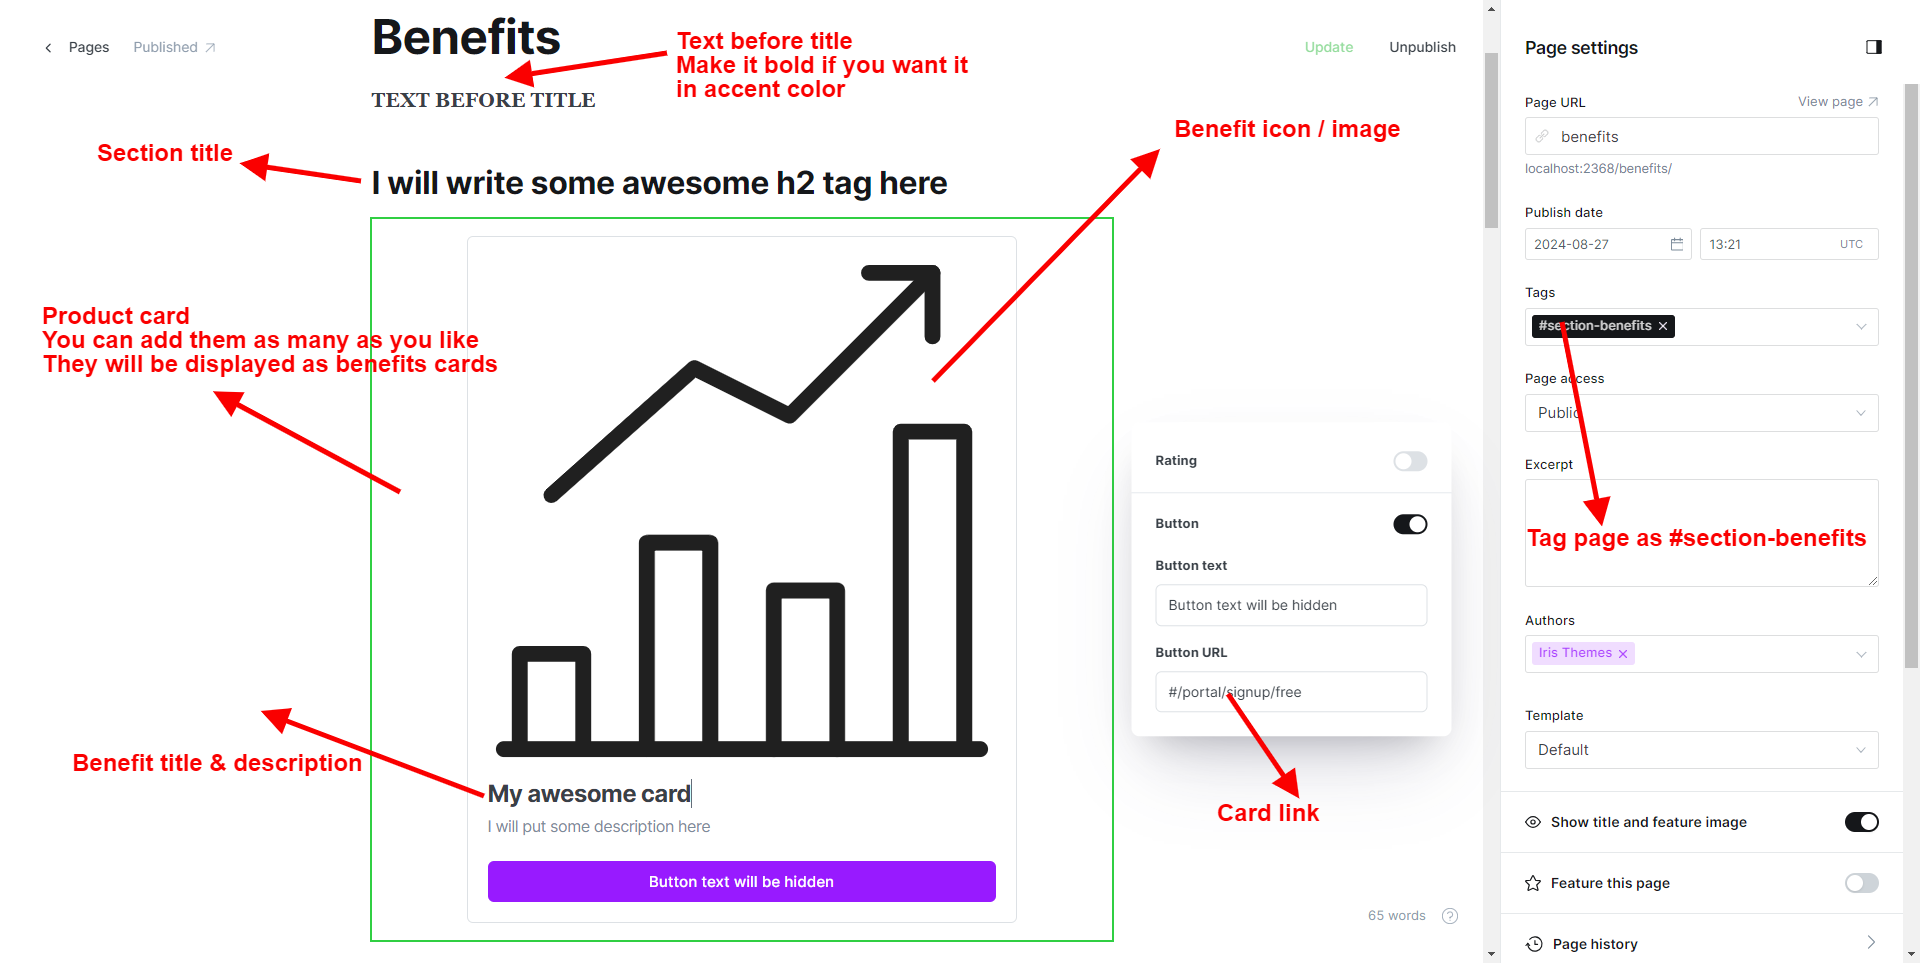
From the Siskin theme version 1.8 you can create a page and add the title, and you can easily add benefits cards via Ghost editor content.
- Create a Page named Benefits.
- Tag it with the internal tag #section-benefits
- Add content to it
- It would be best to ensure that the field named Benefits content inside Settings / Design & branding / Homepage is, the Siskin theme has anso the content from the page is displayed.
Example of a page tagged with #section-benefits
The result - OMG, so many cards 😄
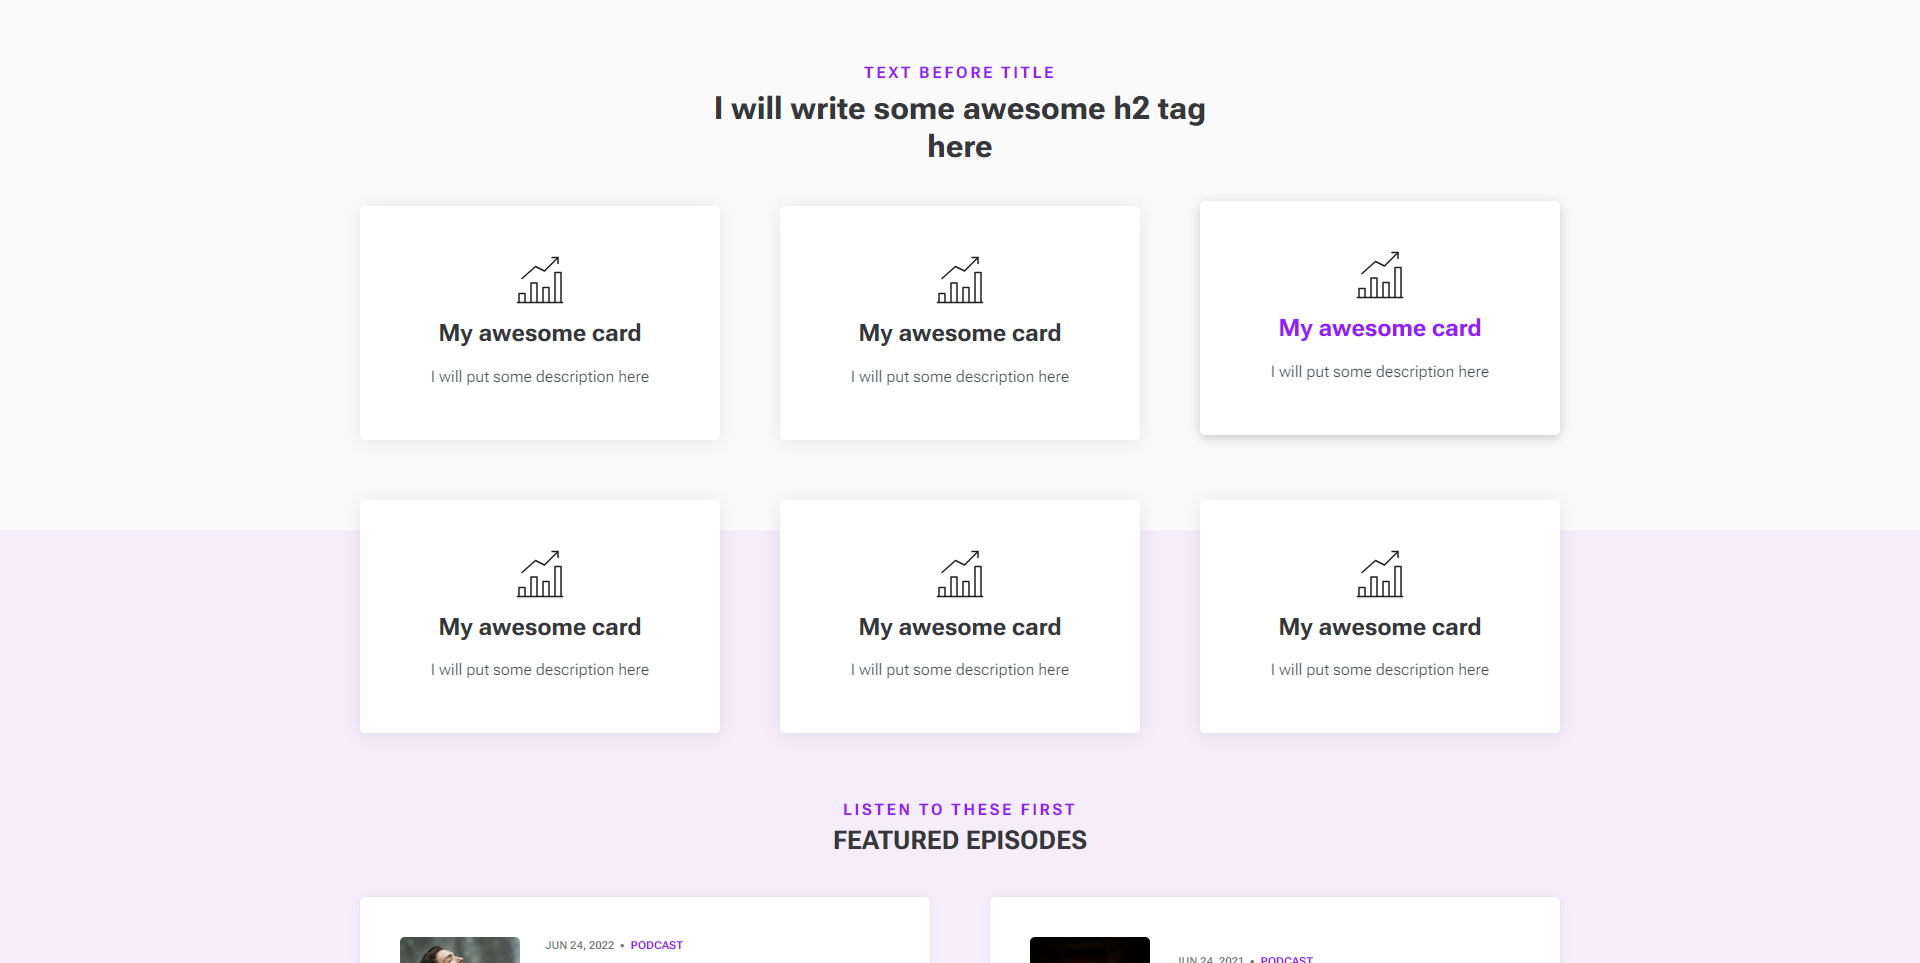
You can still use the "old way," but we think this is more elegant for our users. It is simple: if you add content to theme options, that content will be displayed, and if you add a page, the page will be displayed.
The old way of adding benefits
From the Siskin 1.4 version - you no longer need to edit this section via code. You display any content here with the proper markup.
The proper markup means the following HTML structure.
<a href="[YOUR LINK]">
[SVG ICON]
<h3>[TITLE OF THE BENEFIT]</h3>
<p>TEXT OF THE BENEFIT</p>
</a>
This means you must add this code three times to have three boxes that look like this.

Podcast section
The podcast section on the Home page lists four posts tagged with the Podcast tag and marked as Featured.
From the Siskin 1.4 version - you no longer need to edit this section via code or be specific with the Podcast tag. You can list any post here right away by using internal tags.
Go to your desired post, edit it, and add an internal tag named #post-area-1.

This means you can add any tag slug and display featured posts from this slug in this area.
However, if you want to edit the Podcast section on a Home page, you must edit the following .hbs file siskin/partials/section-podcast.hbs. For example:
{{#get "posts" filter="tag:[podcast,hash-post-area-1]+featured:true" limit="4" include="tags" order="published_at desc"}}If you want to change the number of posts displayed on a home page, you must change the limit="4" to the desired number of posts.
Blog section
The blog section on the Home page lists 4 posts that are tagged with a Blog.
From the Siskin 1.4 version - you no longer need to edit this section via code or be specific with the Blog tag. You can list any post here right away by using internal tags.
Go to your desired post, edit it, and add an internal tag named #post-area-2.

This means you can add any tag slug and display posts from any tag in this area. In this example, we added a post tagged with the "Newsletter" tag.
However, if you want to edit the Blog section on a Home page, you must edit the following .hbs file siskin/partials/section-blog.hbs. For example:
{{#get "posts" filter="tag:[blog,hash-post-area-2]" limit="4" include="tags" order="published_at desc"}}If you want to change the number of posts displayed on a home page, you must change the limit="4" to the desired number of posts.
About me Section
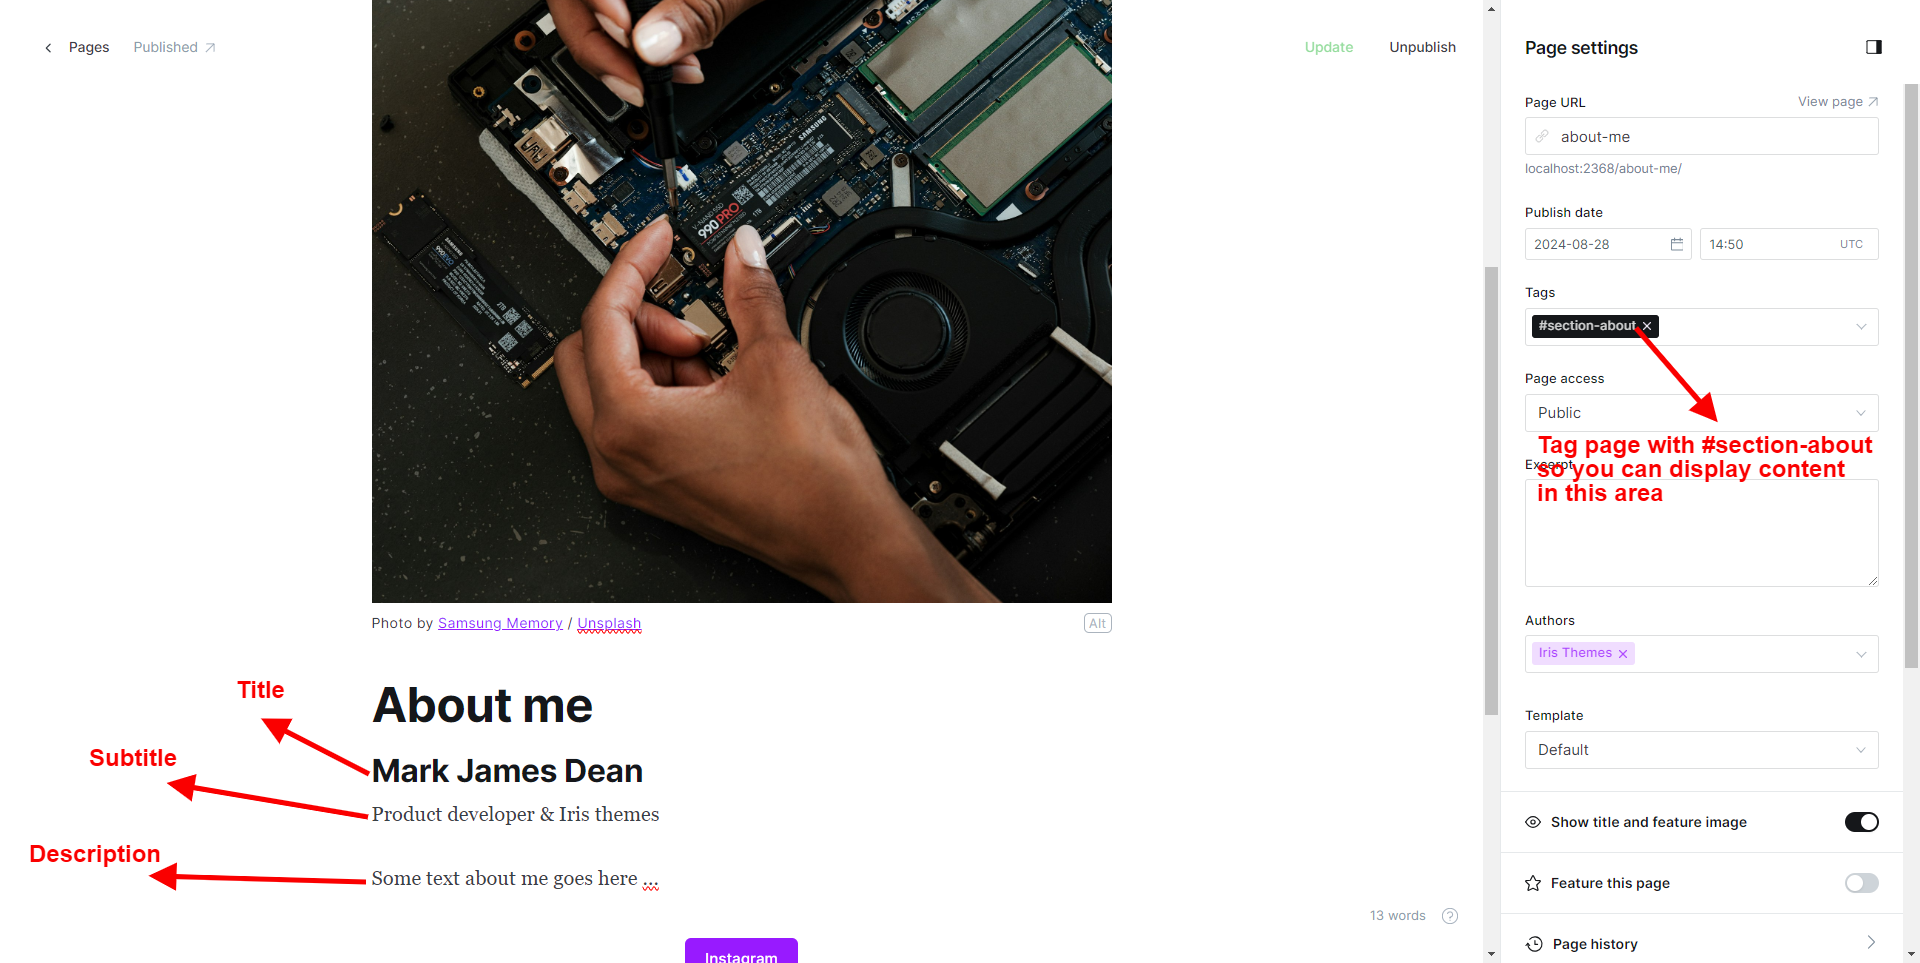
From the Siskin 1.8 version, you can now add content to this section via the Ghost editor page.
All you need to do is follow
- Create a page About me
- Tag it with #section-about
- Add the content to it
You can also add social media buttons with links to social media. Our theme will automatically recognize them and add icons and colors to the buttons.
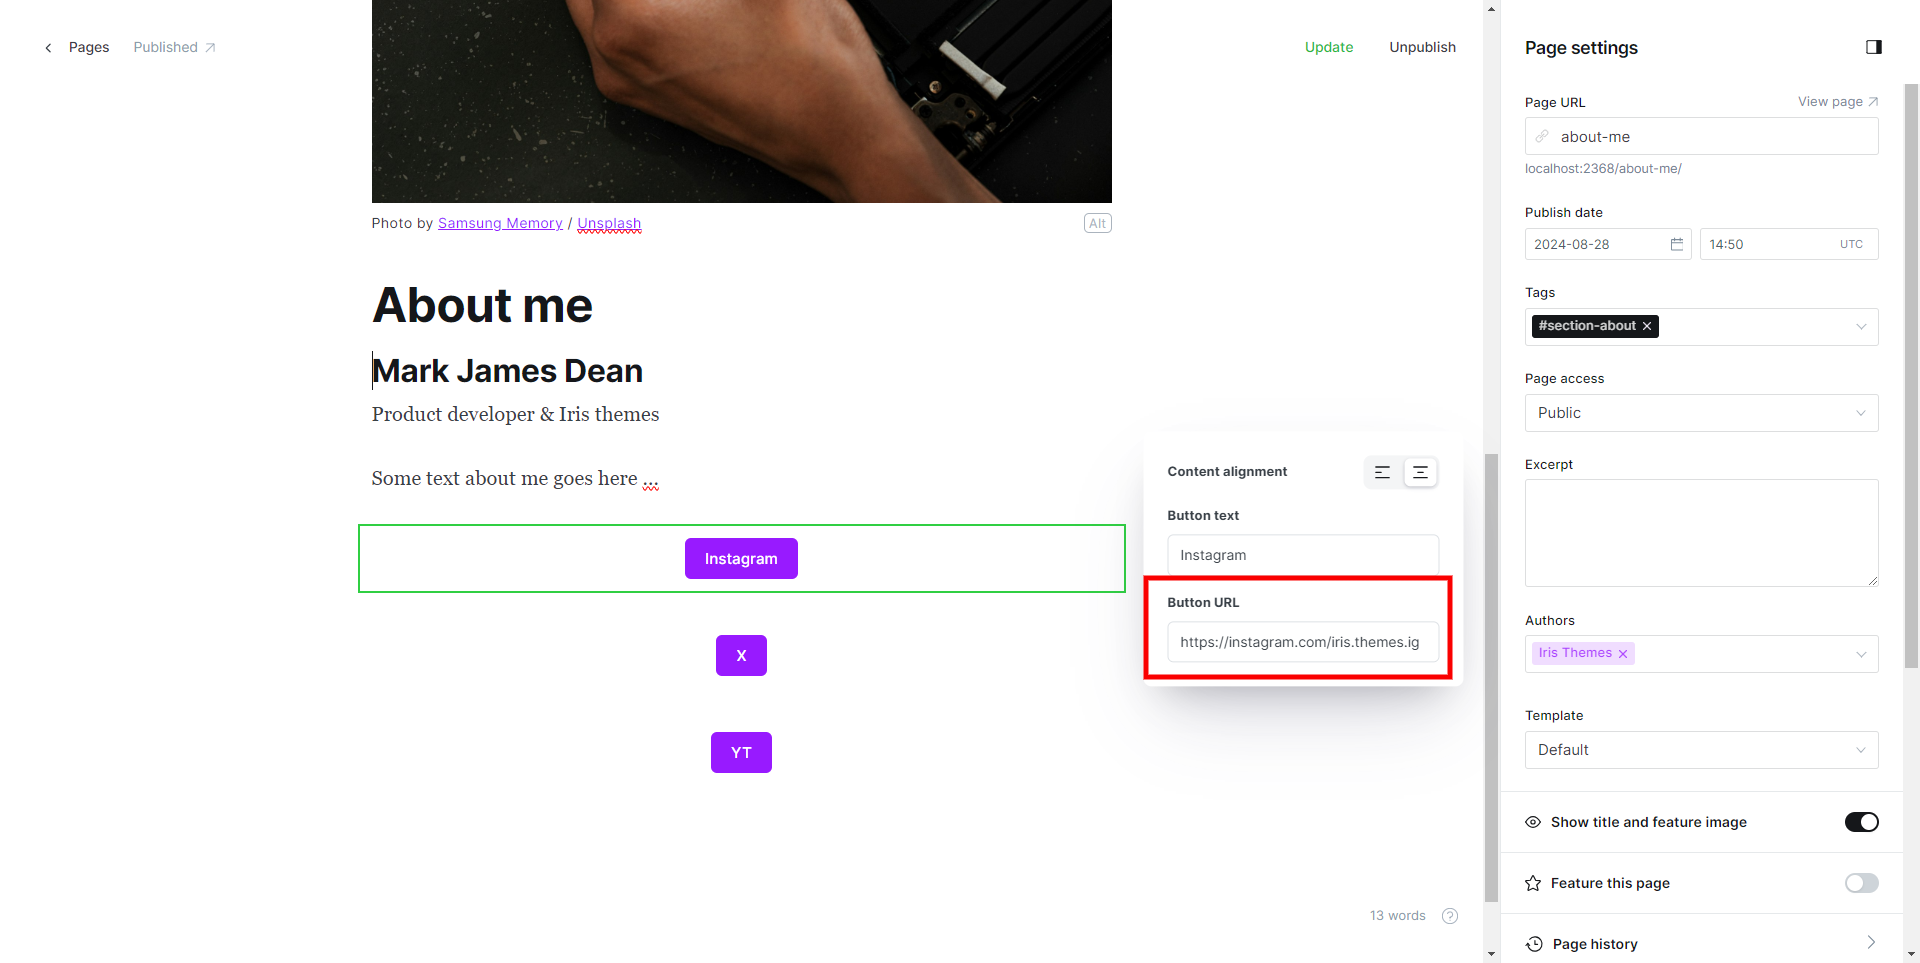
The output should look like this.
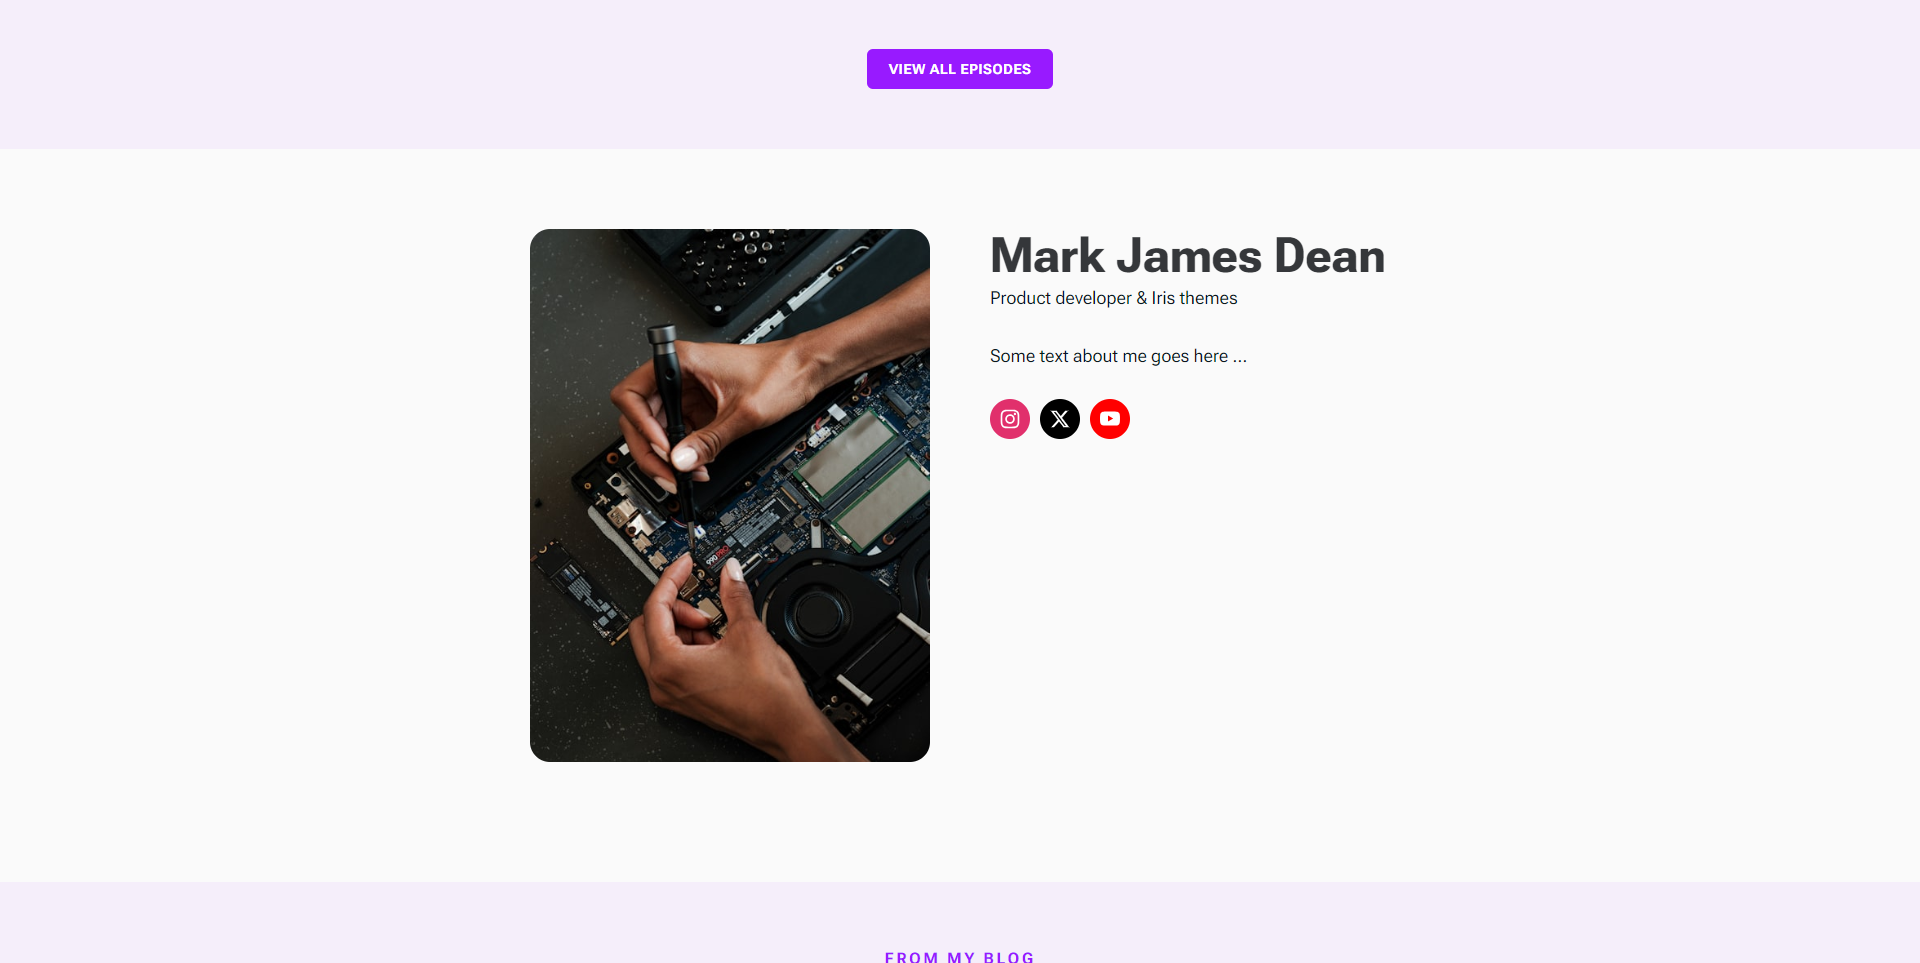
You can add all the most popular Social media icons like:
- Twitter / X - if you use the URL Twitter, you will have a bird icon - if you prefer x, just use the x.com URL 😄
- Snapchat
- Youtube
- Telegram
- Tiktok
- You can contact us requests if you have some other request for the icons
- From the Siskin 1.3 version, you can edit this part of the home page from theme options.
Old way of adding about me section

You can paste HTML inside about text area to get the desired look.
If you want to edit the about me manually (Host) section contains several elements that can be replaced inside siskin/partials/section-about.hbs:
    <div class="grid-item p-0 bg-none">
        <img class="br-s" src="{{asset "img/host-image.png"}}" alt="John Doe">
    </div>

    <div class="grid-item p-0 bg-none flex-and-center">
        <h3 class="h2 mb-1">John Doe</h3>
        <p class="h4 op-5">Influencer, podcaster, mentor and fitness addict.</p>
        <p>For over 12 years, I've been providing my skills in digital marketing, finance and creative writing to clients such as Southhealth, Duffer, Cetlify, Boctopus Energy, Atackbit and many more.</p>

        <p>The purpose of this podcast is to inspire listeners and adventure seekers to live intentionally, place value on experiences instead of possessions, and most of all, to encourage others to find joy exploring this beautiful world!</p>

        <p>Check out my gear and articles. If you like what you see get in touch.</p>
    </div>
To change the Host image, copy the desired image to the/assets/img folder and rename it host-image.png.
CTA Section (Newsletter)
From the Siskin 1.4 version - you no longer need to edit this section via code. You display any content here with the proper markup.
The proper markup means the following HTML structure.
<span>EVERY WEDNESDAY</span><h4>DOSE OF WISDOM IN YOUR INBOX</h4>
This means that you can add any HTML to these areas.
If you want to edit the Newsletter section, you will need to edit the following .hbs file siskin/partials/section-newsletter.hbs
    <div class="mb-4 text-center inner-title">
            <span class="h5 text-accent">{{t "Every WEDNESDAY"}}</span>
            <h4>{{t "DOSE OF WISDOM IN YOUR INBOX"}}</h4>
    </div>

    <div class="siskin-newsletter-box__content inner">

        <div class="siskin-newsletter-box__text text-medium">
        <p>{{t "By signing up for the Siskin mailing list you will receive exclusive finance and marketing resources, be the first to hear about events, workshops, and have access to subscriber only content!"}}</p>
        </div>
Podcast networks list
The subscribe section (e.g. “Subscribe on …”) is filled from a single script in your site footer. You define which platforms to show by providing their URLs.
How to set it up
In Ghost Admin, go to Settings → Code injection.
In Site footer, add a JSON script with the same ID the theme expects and your subscription
<script type="application/json" id="podcast-subscribe-urls">
{
  "YouTube": "https://youtube.com/@yourchannel",
  "Apple Podcasts": "https://podcasts.apple.com/...",
  "Spotify": "https://open.spotify.com/show/...",
  "Overcast": "https://overcast.fm/...",
  "RSS": "https://yoursite.com/podcast/rss/"
}
</script>
Only platforms that have a URL in this JSON are shown.
If you leave out a platform or set it to empty, it won’t appear in the subscribe list.
Blog setup
Editing the number of blog posts on the Home page
- Go to the theme root folder and look for partials/section-blog.hbs
- In your code editor, please find and edit the following code.
{{#get "posts" filter="primary_tag:blog" limit="4" include="tags"}}
You should edit and save the code's limit="4" part to the desired one.
Editing meta displayed on blog cards on the Home Page
- Go to the theme root folder and look for partials/section-blog.hbs
- In your code editor, please find and edit the following code
{{> "blog-card" post-excerpt=true post-date=true post-tags=true reading-time=false}}
You can edit the following code, for example, to set reading-time=false if you don't want the post excerpt displayed on a Home Page. The options are self-explanatory; the only important thing is that you use a true/false statement.
The Section should look like this:
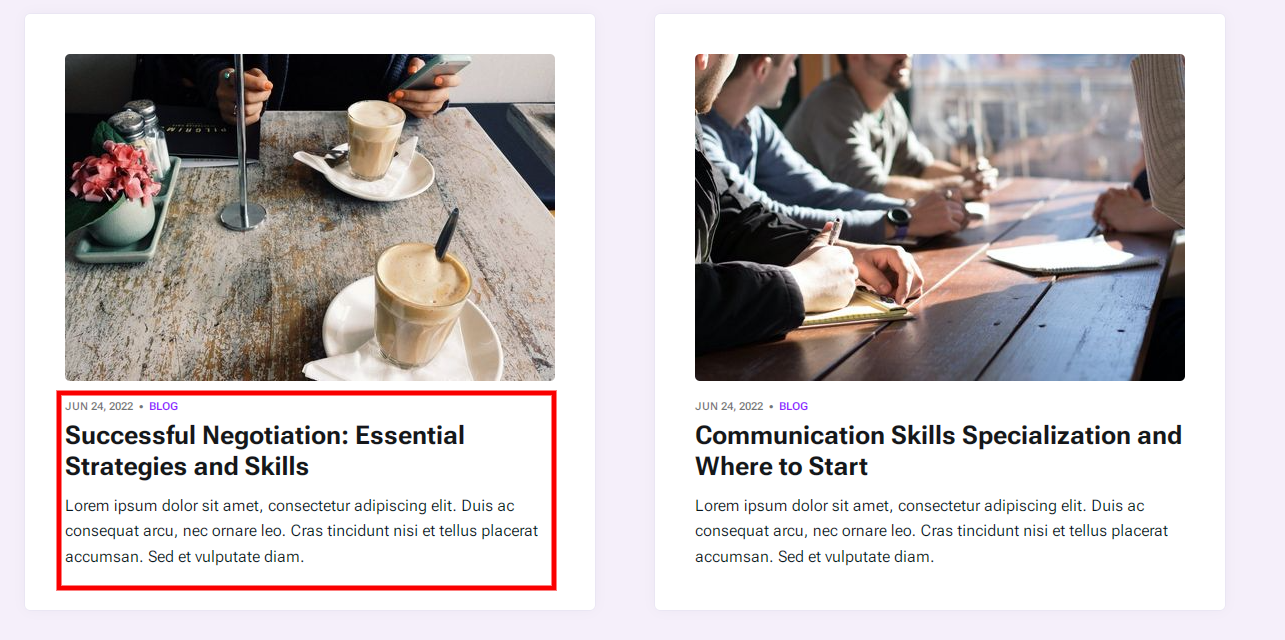
Editing meta displayed on blog cards on Blog Page
- Go to the theme root folder and look for the partials/custom-blog folder.hbs
- In your code editor, please find and edit the following code
{{> "blog-card" post-excerpt=true post-date=true post-tags=true reading-time=false}}
Podcast setup
Adding episodes with self-hosted audio
Suppose you want to mp3/audio each episode. You can use the Siskin theme functionality. Since Ghost doesn’t have custom fields, we have repurposed the Facebook description field for each post to store the audio file link.
- Go to Posts > New post to create a regular post, and give it a title and some description in the editor.
- Enter the self-hosted episode audio URL in the Post settings > Facebook card > description field.
- You can host your audio file anywhere (e.g., a third-party service or a CDN), paste the provided URL into the Facebook description, and you should be all set.
Adding episodes from third-party services
Siskin features a powerful audio player that lets users play self-hosted episodes while reading transcriptions. Siskin theme also supports audio & video embedded content, individual episodes or embedded playlists.
The Siskin theme allows embedding files from the following podcast networks:
- Spotify
- Apple podcasts
- YouTube
- SoundCloud
- Mixcloud
- Stitcher
- PodBean
- Blubrry LibSyn
- Spreaker
- Cadence
- Podomatic
- Deezer
- Ausha
- Cadence13
- Transistor
- Megaphone. fm
- and many more...
Editing the subscribe list
The theme comes with the following podcast services icons:
- Apple Podcasts
- Overcast
- Spotify
- Pocket Casts
- Castro
- Google Podcasts
If you want to change or add new icons, go to /partials/subscribe-list.hbs and edit it:
<ul class="siskin-subscribe-list">
    <li>
        <a href="" class="siskin-subscribe-list__link" target="_blank" rel="noopener noreferrer">
            <span class="siskin-subscribe-list__icon">{{> icons/apple }}</span>
            <span class="siskin-subscribe-list__name">{{t "Apple podcasts" }}</span>
        </a>
    </li>

    <li>
        <a href="" class="siskin-subscribe-list__link" target="_blank" rel="noopener noreferrer">
            <span class="siskin-subscribe-list__icon">{{> icons/spotify }}</span>
            <span class="siskin-subscribe-list__name">{{t "Spotify" }}</span>
        </a>
    </li>


    <li>
        <a href="" class="siskin-subscribe-list__link" target="_blank" rel="noopener noreferrer">
            <span class="siskin-subscribe-list__icon">{{> icons/overcast }}</span>
            <span class="siskin-subscribe-list__name">{{t "Overcast" }}</span>
        </a>
    </li>
</ul>
Editing the number of podcast posts on the Home page
- Go to the theme root folder and look for partials/section-podcast.hbs
- In your code editor, please find and edit the following code
{{#get "posts" filter="primary_tag:podcast+featured:true" limit="4" include="tags"}}You should edit and save the code's limit="4" part to the desired one.
Editing meta displayed on podcast cards on Home Page
- Go to the theme root folder and look for partials/section-podcast.hbs
- In your code editor, please find and edit the following code
{{> "post-card" post-excerpt=true post-date=true post-tags=true}}
Post setup
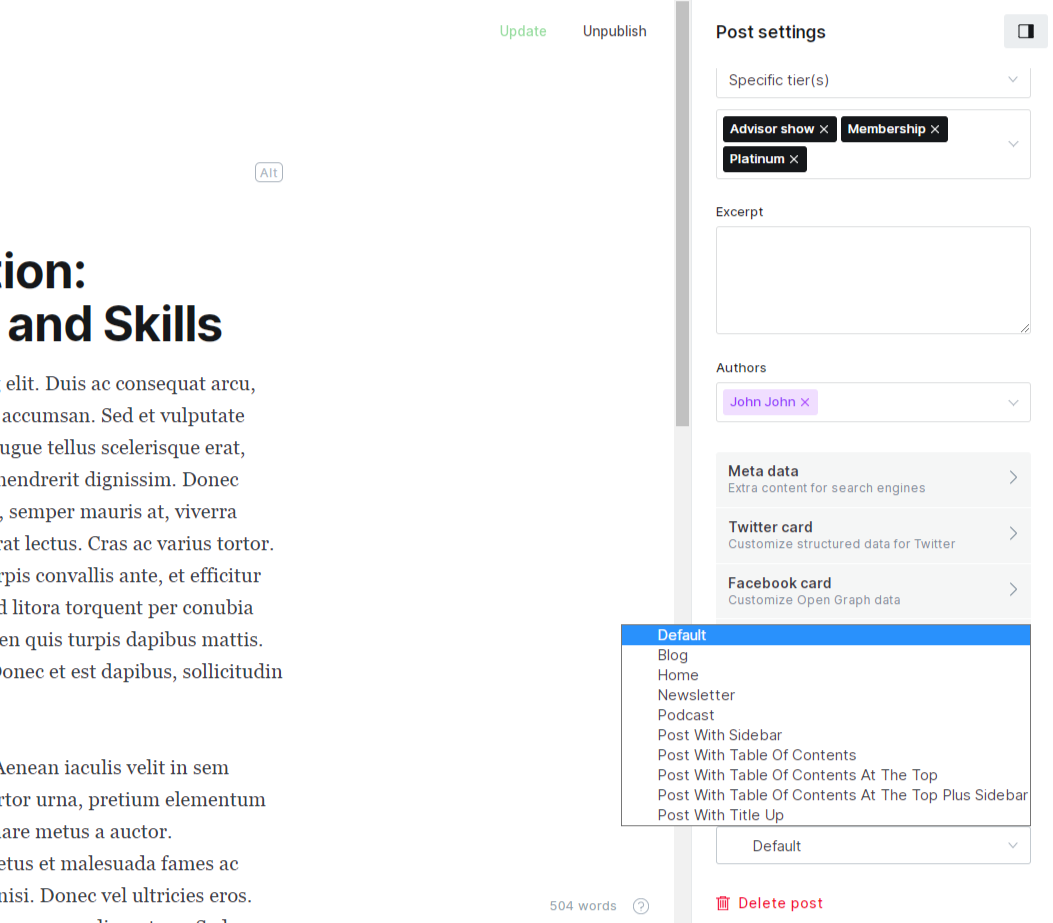
The Siskin theme comes with several Single Post templates
- Regular single post template
- Post with the title above the featured image
- Post with Table of contents
- Post with sidebar
- Post with Table of contents above content
- Post with Table of contents above content + sidebar
To change the desired Post template, go to Post → Edit and choose Post template from the template select box.
Progress bar setup
From version 1.2, the Siskin theme has anTo added Progress bar (Reading time) in every post/page template.
Toset up disable this feature, you must find the following code and remove it from your .hbs post templates.
{{!-- Fixed progres bar element --}}
{{>progress-bar}}
TOC (Table of contents) setup
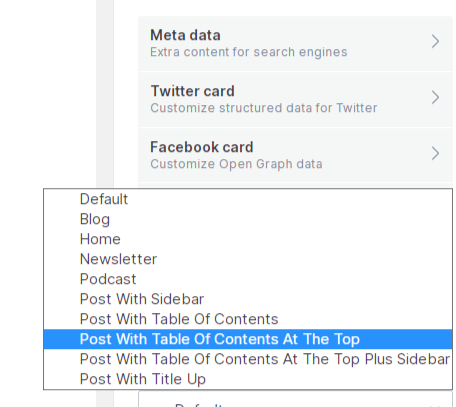
The Siskin theme includes several table of contents and post templates.
All you need to do is choose the desired style of the Table of contents post template and enter the desired content. The theme will automatically pull H1, H2, H3, and H4 tags from your content and display them in the Table of contents.
Podcast episode links (“Listen to this episode on”)
You can add a “Listen to this episode on:” block on single posts with links to the same episode on different platforms (e.g. Apple Podcasts, Spotify).
How to set it up
1. In the post editor, open the Code injection tab (post settings on the right).
2. In Post code injection, add a JSON script with the platform name and URL for each place the episode is available.
<script type="application/json" id="podcast-episode">
{
  "YouTube": "https://youtube.com/watch?v=...",
  "Apple Podcasts": "https://podcasts.apple.com/...",
  "Spotify": "https://open.spotify.com/episode/...",
  "Overcast": "https://overcast.fm/...",
  "RSS": "https://yoursite.com/podcast/rss/"
}
</script>
Use the exact keys: `YouTube`, `Apple Podcasts`, `Spotify`, `Overcast`, `RSS`. You can omit any platform you don’t use.
The theme turns this into buttons with icons. Only platforms you include in the JSON will appear.
Page setup
Besides having posts, you can also create pages. For this:
- Make sure that you are logged into your publication at yourawesomeblog.com/ghost/signin
- Go to Pages.
- Click New page.
- Add the page title (which will be the slug/URL for the page as well).
- Add content for the page.
- Click Publish.
The Siskin theme comes with several Single Page templates
- Regular single-page template
- Page with the title above the featured image
To change the desired Page template, go to Page → Edit and choose Page template from the template select box.
Icons
All the icons used inside the Siskin theme are SVG icons. They are located inside the siskin/partials/icons folder.
If you want to add or change icons, you can go to the SVG provider website, select the icon you want to add copy the code. Then, find the desired icon you wish to change and open or create the icon.svg file; after this, all you need to do is to paste copied code.
<svg viewBox="0 0 24 24" xmlns="https://www.w3.org/2000/svg">
<g fill="none" fill-rule="evenodd">
<path d="M3.513 18.998C4.749 15.504 8.082 13 12 13s7.251 2.504 8.487 5.998C18.47 21.442 15.417 23 12 23s-6.47-1.558-8.487-4.002zM12 12c2.21 0 4-2.79 4-5s-1.79-4-4-4-4 1.79-4 4 1.79 5 4 5z" fill="#FFF"/>
</g>
</svg>
List of helpful SVG icons
Integrations
You can access Integrations in the admin section. Integrations can be used to connect built-in or custom functions to Ghost. How to create a custom integration:
- Log in to your publication admin section at yourawesomeblog.com/ghost/signin
- Click Settings > Integrations.
- Under Custom Integrations, click Add Custom integration
- Please provide a name for it
- Add description
- Content API Key is generated, which will be needed by the custom function to access Ghost data.
Contact page setup
How to add a contact page
- Go to Pages → New page
- Name the page "Contact."
- Choose the default page template.
- Choose to add a raw HTML card and go to https://formspree.io/library/simple-contact-form/
- Copy and paste simple HTML code with your form spree ID.
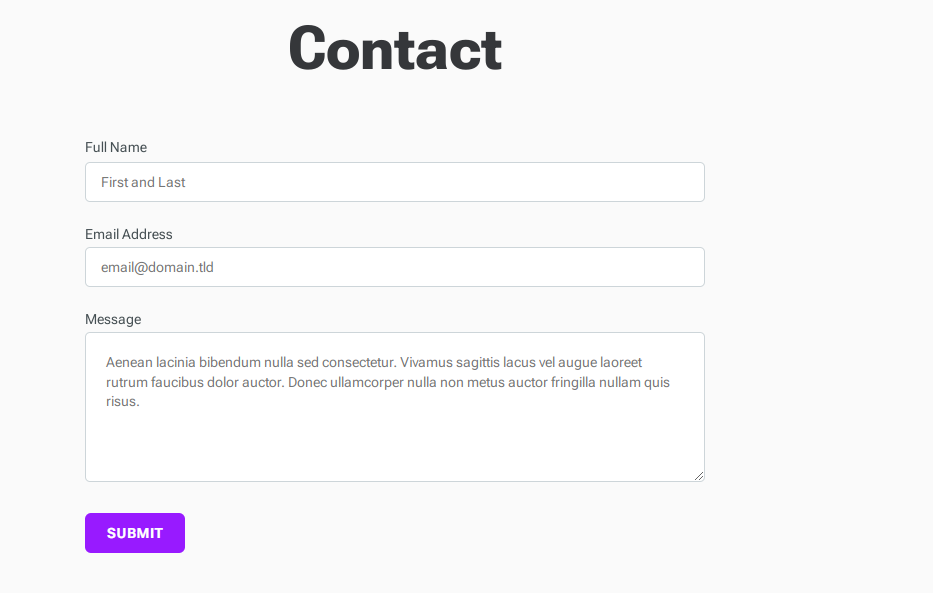
<form id="fs-frm" name="simple-contact-form" accept-charset="utf-8" action="https://formspree.io/f/{form_id}" method="post">
  <fieldset id="fs-frm-inputs">
    <label for="full-name">Full Name</label>
    <input type="text" name="name" id="full-name" placeholder="First and Last" required="">
    <label for="email-address">Email Address</label>
    <input type="email" name="_replyto" id="email-address" placeholder="[email protected]" required="">
    <label for="message">Message</label>
    <textarea rows="5" name="message" id="message" placeholder="Aenean lacinia bibendum nulla sed consectetur. Vivamus sagittis lacus vel augue laoreet rutrum faucibus dolor auctor. Donec ullamcorper nulla non metus auctor fringilla nullam quis risus." required=""></textarea>
    <input type="hidden" name="_subject" id="email-subject" value="Contact Form Submission">
  </fieldset>
  <input type="submit" value="Submit">
</form>
You should get something like this.
Newsletter setup
Siskin theme comes with a custom newsletter page template where you can list all your newsletters and previous newsletter releases.
Creating a newsletter page
- Create a page named Newsletter Page → New
- Pick the Newsletter page template
- Assign the featured image to this page
- Add some content that will go before the newsletter form
- Click save
Adding newsletter integration
- Go to Settings → Integrations
- Click Add custom integration, name it and save it
- Copy the content API key
- Go to Design → Sitewide
- Paste the Content API key so the website can pull the newsletters via API and display them on the front end.
Adding newsletters
- Go to Settings → Email newsletter
- You will see the list of active newsletters
- Click Add newsletter
- Name the newsletter and assign a description to it
- Click save, and you should look similar to the newsletter page template example.
- If you have an active new newsletter, the front end of the website will only display a newsletter submission form.
Adding newsletter category and posts
- Go to Tags → New tag
- Name the tag "Newsletter."
- Click save
- Assign the tag or create a new post with the "Newsletter" tag
- Click Publish
- Newsletter posts should be listed on the newsletter page template and the newsletter tag page.
Archive page
From Siskin 1.3 you can add an archive page where you can list all the posts that are on your website by year.
You need to create a page named Archive and pick Archive page template.

You will get something like this

Membership page
From Siskin 1.3 you can have a membership page listing all your Membership tiers.
All you need to do is to create a Page template

Publication
Publication settings
Here are some helpful links on how to set up your Ghost publication.
Useful External links
Adding Sub Menu (Dropdown menu)
From version 1.2 Siskin theme offers Support for the Dropdown menu.
All you need to do is the following:
- Go to Settings → Design → Homepage
- Find the option "Enable dropdown menu" and ensure it is switched on.
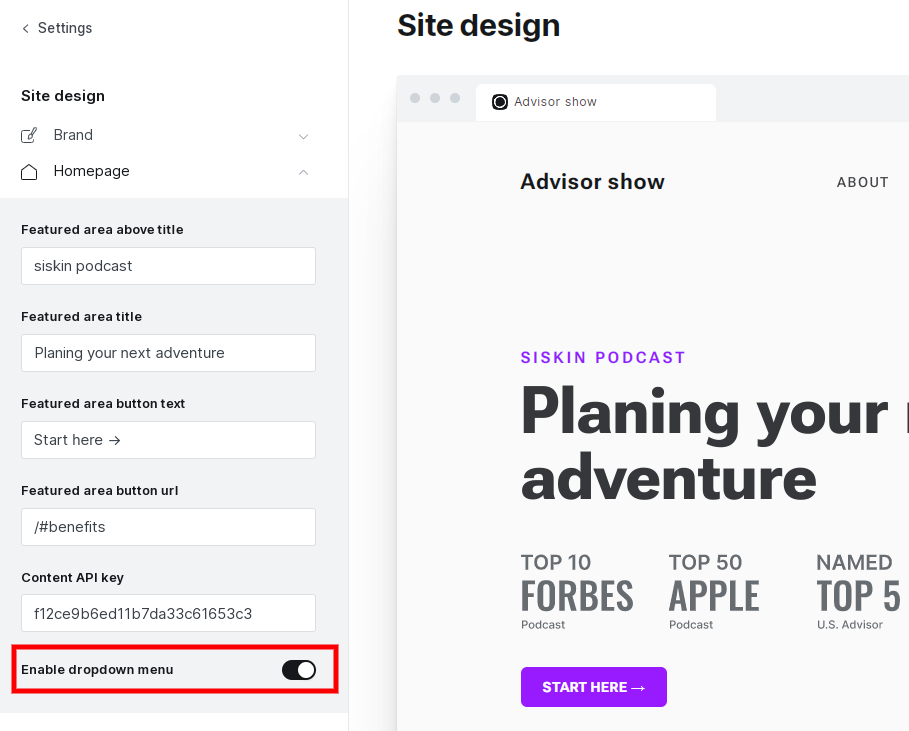
Do not worry if you don't get the live preview right away, click save and refresh your browser window, and the dropdown menu should be there.
- Go to Settings → Navigation.
- Add items to the Primary menu.
- Prefix items with "--" if you want to add them to the Dropdown menu
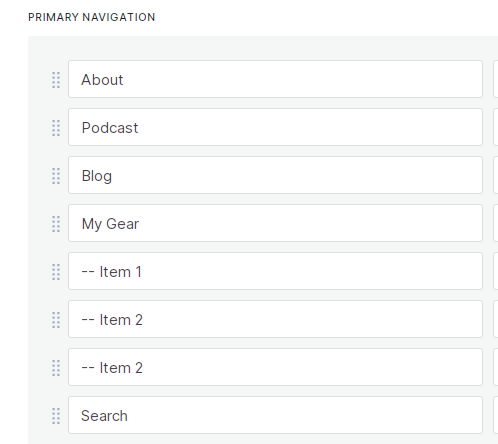
This should be the result.

Favicon settings
To set the publication favicon, follow the steps below.
- Log in to your publication admin section at yourawesomeblog.com/ghost/signin.
- Go to Settings → Design Brand from the admin menu.
- Under the Brand tab, you should find the Publication icon option where you can upload a square, social icon, at least 60x60px
Logo settings
To set the publication logo, follow the steps below.
- Log in to your publication admin section at yourawesomeblog.com/ghost/signin.
- Go to Settings → Design Brand from the admin menu.
- Under the Brand tab, you should find the Publication logo option, where you can upload a logo image that should be transparent and at least 600x72px
Members settings
The Siskin theme completely supports the Ghost Members feature. Starting with Ghost v4, this feature is enabled by default, and you can access it by navigating to Settings → Membership.
To access portal settings, you need to click on the button called Customize Portal.
- Subscription access - you can setup if the signup is open, invite-only, or not possible at all
- Default post access - settings for default post access. Options are: Public, Members only, Paid-members only.
- Connect to Stripe - configure the connection to your Stripe account to be able to accept/process payments. Make sure that your SSL is entirely set up.
- Membership tiers - define the monthly and yearly price for access to your publication.
- Email newsletter settings - setup sending emails for member signup/sign-in, Mailgun configuration needed ( GhostPro users do not have to configure it)
How to add a custom Sign in page
From Siskin 1.8 you can add a custom Sign in page - you need to do the following:
- Add the following code to the routes.yaml file
routes:
  /signup/: members/signup
  /signin/: members/signin
Posts Per Page settings
Inside package.json, you can set up how many posts you want to display inside the post loop. This will affect your Blog, Podcast and Tags pages.
 "config": {
        "posts_per_page": 4,
Change the posts_per_page parameter to desired post number.
If you edit the file manually, you must restart Ghost to see the changes.
Routes settings
Siskin uses basic routing, and if you want to have the same setup as on the demo website, you will need to do the following steps:
- Log in to your publication admin section at yourawesomeblog.com/ghost/signin
- Click Settings → Labs.
- Click on Download current routes.yaml to download existing routes file
- Open and edit existing routes.yaml file
- Upload routes.yaml file with a click on the "Upload routes YAML" button and select the file that you edited
Basic configuration for Siskin 1.8 theme demo:
routes:
  /podcast/rss/:
    template: rss
    content_type: text/xml
  /signup/: members\signup
  /signin/: members\signin
  /:
    data: page.home
    template: custom-home

collections:
  /blog/:
    permalink: /blog/{slug}/
    template: custom-blog
    filter: tag:blog
    data: tag.blog
  /podcast/:
    permalink: /podcast/{slug}/
    filter: tag:podcast
    template: custom-podcast
    data: tag.podcast
  /:
    permalink: /{slug}/
    template: index

taxonomies:
  tag: /tag/{slug}/
  author: /author/{slug}/
The Siskin Podcast Ghost theme is created with two primary collections (Podcast and Blog).
Search settings
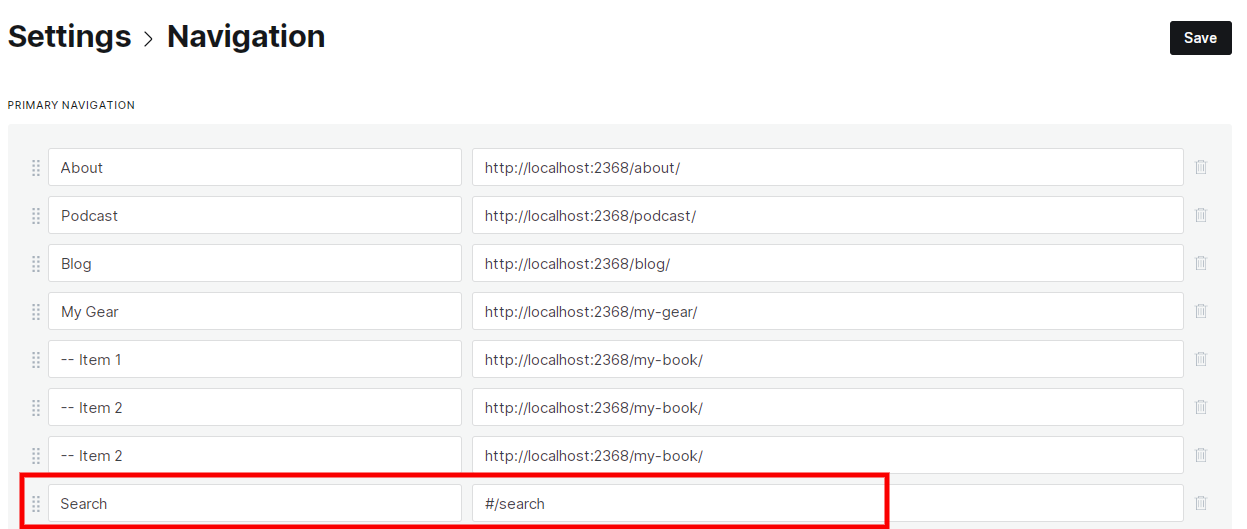
Version 1.2 of the Siskin Theme has implemented native Ghost search functionality.
All you need to do is to go to Settings → Navigation → Primary menu and adding#/search to the URL label.
Recommendation settings
From November 1st, you can now Recommendations functionality you would like to recommend to your visitors.
All you need to do is to go to Settings → Navigation → Primary menu and add #/portal/recommendations to the URL label - our theme will do the rest.
PWA (Progressive web app)
From version 1.5 Siskin theme supports PWA feature.
To enable PWA on your site, you need to do the following.
- Edit manifest.json file inside the theme directory - add your website details
- Upload app icons inside /assets directory (icon-192x192.png and icon-512x512.png)
- ZIP theme folder, upload and activate the theme
- Go to Settings / Code injection
- Paste the following code
<script>
    var serviceWorkerUri = '/sw.js';
    if ('serviceWorker' in navigator) {
        navigator.serviceWorker.register(serviceWorkerUri).then(function() {
            if (navigator.serviceWorker.controller) {
                console.log('Assets cached by the controlling service worker.');
            } else {
                console.log('Please reload this page to allow the service worker to handle network operations.');
            }
        }).catch(function(error) {
            console.log('ERROR: ' + error);
         });
    } else {
        console.log('Service workers are not supported in the current browser.');
    }
</script>
This will enable the Service worker feature so users can download and install PWA on their devices.
Deploy with GitHub
From version 1.5 Siskin theme is integrated with the Deploy Ghost Theme GitHub Action for easy theme deployment.
How to modify the Siskin theme?
Like any other Ghost theme, Siskin uses a simple templating language called Handlebars for its themes. The Siskin theme is developer-friendly. If you need to make advanced customization, you will take advantage of the Gulp tasks that are set up for compiling Javascript and CSS Sass.
All the assets are minified and combined for better speed and performance. If you want to make additional customizations, ensure you have Node.js and npm installed.
Here is a tutorial How to install ghost.
To install all the dependencies needed to make customizations to the theme inside the Siskin theme folder, run the following command:
npm install
After installation is complete, you need to run:
gulp
You can always use Code Injection to do additional customizations. If you want to change the text color of the theme, you can add the following code in the Blog Header section.
:root {

    /* Colors */
    --color-darkgrey: #35373A;
}
Siskin theme uses Bootstrap for its initial layout and repeating classes. Core CSS files are located inside the assets/css folder. Siskin theme uses Vanilla JS, so no necessary JS is included (jQuery, for example).
Ghost theme API documentation - which explains every possible Handlebars helper and template.
The main files are:
default.hbs- The main template fileindex.hbs- Used for the home page if you don't have routes filed addedpost.hbs- Used for individual postspage.hbs- Used for individual pagestag.hbs- Used for tag archivescustom-home.hbs- Used for home pagecustom-podcast.hbs- Used for podcast pagecustom-blog.hbs- Used for blog listing page
All the other parts of the theme are located inside partials the folder. You will find files prefixed with section - this means that they are the main file of one bigger section - like a newsletter, for example.
Theme colors
To change the colors of the Siskin theme, you need to look for assets/css/siskin/assets/screen.css file.
You should find something like this:
:root {

    /* Colors */
    --color-darkgrey: #35373A;
    --color-midgrey: #cdd5d9;
    --color-lightgrey: #e1e1e1;
    --color-wash: #e5eff5;
    --color-darkmode: #151719;
    --color-dark: #151719;
    --color-white: #FFF;
    --color-softergrey: #fafafa;
    --color-text: #0a171c;
    --color-meta: rgba(21,23,25,0.6);

}
Here you can easily change the colors and then run gulp command to compile CSS files.
Author box – social links
The author box can LinkedIn, Bluesky, Threads, Mastodon, TikTok, YouTube, and Instagram.
How to set it up
- In Ghost Admin, go to Settings → Staff and open your profile (or the author you want to edit).
- In Social accounts, fill in the URLs for the networks you use.
- The theme will show only the networks you’ve added. No need to edit theme code.
How to change the background color?
Here is a straightforward approach to changing Siskin's soft background color. You can paste this code into your Settings → Code injection page. You can put it inside the head or footer section.
<style>
.bg-softaccent{
    background: rgba(220, 20, 60, 0.1);
}
</style>
From version 2.0.0 this is pullet automatically and you can use this code if you want to tweak theme look.
Changelog
31.01.2026 - Siskin 2.0.0
- Added: Author box social links for LinkedIn, Bluesky, Threads, Mastodon, TikTok, YouTube, Instagram (use author custom fields when available)
- Improved: Soft accent color is now pulled automatically
- Added: Share area redesign – inline share buttons (X, Bluesky, Facebook, LinkedIn, Email, Copy) with icons and label; soft border and shadow; copy button shows “Copied” and check icon on success
- Added: Podcast episode links that can be added to single post – “Listen to this episode on:” block populated from JSON script tag in post code injection; supports YouTube, Apple Podcasts, Spotify, Overcast, RSS
- Added: Subscribe list driven by JSON – add script in site Code Injection / Footer with platform URLs; only platforms with a URL are shown;
- Fixed: Player on Mac – play/pause from footer player bar no longer clears audio src
- Fixed: Player title on single post – when related posts are enabled, the player now shows only the current episode title instead of concatenated titles from the main post and related cards; share URLs use the current post when playing from the article header
27.12.2024 - Siskin 1.9.0
- Added: Option to add video instead of featured image on a Home Page featured area (Settings / Design and Branding / Customize / Theme / Homepage video)
- Added: Support for Typography (Ghost fonts) - you can change fonts under (Settings / Design and Branding / Customize / Brand )
- Improved: We have improved our code, so your videos will now be responsive-
- Fixed: Several minor styling issues
06.9.2024 - Siskin 1.8.1
- Fixed: Translation files JSON parse errors – thanks to Andreas for reporting this to us
Siskin 1.8.0
- Added: Signin and Signup custom pages
- Improved: Benefits area - you can now add a page with an internal tag #section-benefits and use a Product card as a benefit and display it on the home page
- Improved: About me area - you can now add a page with content and tag it with the internal tag #section-about, and the content will appear
- Improved: About me area - you can now add the most popular social networks (X, FB, YT, IG, TG and more ...)
- Added: Translation strings for Portuguese, Italian, French, German, Spanish, Finish, Dutch, Danish, Finish language
- Fixed: Several minor styling issues
Modified: README.md
Modified: assets/built/global.css
Modified: assets/built/global.css.map
Modified: assets/built/screen.css
Modified: assets/built/screen.css.map
Modified: assets/css/global.css
Modified: assets/css/screen.css
Added: assets/icons/facebook.svg
Added: assets/icons/instagram.svg
Added: assets/icons/snapchat.svg
Added: assets/icons/telegram.svg
Added: assets/icons/tiktok.svg
Added: assets/icons/twitter.svg
Added: assets/icons/x.svg
Added: assets/icons/youtube.svg
Added: default-empty.hbs
Added: locales/da.json
Added: locales/de.json
Modified: locales/en.json
Modified: locales/es.json
Added: locales/fi.json
Modified: locales/fr.json
Added: locales/it.json
Added: locales/nl.json
Added: locales/pt.json
Added: members/signin.hbs
Added: members/signup.hbs
Modified: package.json
Modified: partials/section-about.hbs
Modified: partials/section-benefits.hbs
Modified: partials/section-featured-area.hbs
Siskin 1.7.0
- Improved: Featured area display and options
- Fixed: Several minor styling issues
Siskin 1.6.0
- Added: Post access meta labels
- Added: Featured area options - you can now pick between Featured in images, Newsletter form, Podcast networks and None.
- Added: Recommendations - New ghost feature
- Added: YouTube icon
- Fixed: manifest.json path was causing the problem - this is now fixed
- Fixed: Several minor styling issues.
Modified: README.md
Modified: assets/built/global.css
Modified: assets/built/global.css.map
Modified: assets/built/screen.css
Modified: assets/built/screen.css.map
Modified: assets/css/global.css
Modified: assets/css/screen.css
Added: assets/icons/heart-share.svg
Modified: default.hbs
Modified: package.json
Added: partials/icons/youtube.hbs
Modified: partials/section-featured-area.hbs
Modified: partials/subscribe-list.hbs
Modified: README.md
Modified: partials/blog-card.hbs
Modified: partials/post-card.hbs
Siskin 1.5.0
Update date: 7.8.2023
- Added: PWA (Progressive Web App) - your website can now be browsed offline and used as an app with just few tweaks
- Added: Deploy with GitHub
- Improved: Support for new Ghost page editor ( @page.show_title_and_feature_image)
- Fixed: Several minor styling issues
Added: .github/workflows/deploy-theme.yml
Modified: README.md
Added: assets/icon-192x192.png
Added: assets/icon-512x512.png
Modified: default.hbs
Added: manifest.json
Modified: package.json
Added: sw.js
Modified: page.hbs
Siskin 1.4
Update date: 8.6.2023
- Improved: Post selection for homepage - you can now use internal tags [#post-area-1 & #post-area-2] to add posts to 2 sections on the Homepage
- Improved: Benefits box editing - you can now edit the Benefits section from [Settings / Design / Homepage / Benefits content]
- Improved: CTA box [newsletter box] editing - you can now edit the Benefits section from [Settings / Design / Homepage / CTA Title & CTA Text]- Fixed: Several minor styling issues
README.md
assets/built/screen.css
assets/built/screen.css.map
assets/css/screen.css
package.json
partials/section-about.hbs
partials/section-benefits.hbs
partials/section-blog.hbs
partials/section-newsletter.hbs
partials/section-podcast.hbs
Siskin 1.3.0
Update date: 1.6.2023
- Added: Set of theme options for the front page's most important sections
- Added: All posts (archive) page template
- Added: Membership page template
- Added: Related posts at the end of posts [Settings / Design / Post options]
- Fixed: Google Podcasts Icon problem
- Fixed: Several minor styling issues
Modified: assets/built/screen.css
Modified: assets/css/screen.css
Added: custom-archive.hbs
Added: custom-membership.hbs
Added: partials/related-posts.hbs
Modified: package.json
Modified: partials/section-about.hbs
Modified: partials/section-blog.hbs
Modified: partials/section-podcast.hbs
Modified: custom-post-with-table-of-contents-at-the-top.hbs
Modified: custom-post-with-table-of-contents.hbs
Modified: custom-post-with-title-up.hbs
Modified: default.hbs
Modified: post.hbs
Siskin 1.2.0
Update date: 10.10.2022
- Added the Progress bar at the top of posts
- Added Reading time option in templates (reading-time=true in templates)
- Added Ability to have a dropdown menu in the main navigation (Design / Site-wide / Enable dropdown menu )
- Added Table of contents page template with sidebar
- Added Table of contents page template with ToC at the top of post/page
- Added Pages widget (widget-pages.hbs)
- Added Support for native Ghost Search functionality (add Search to the main menu, and you are good to go :) )
- Improved Form styling improvements so you can have a nice contact form
- Fixed Several minor styling issues
 README.md
 assets/built/global.css
 assets/built/global.css.map
 assets/built/main-min.js
 assets/built/main-min.js.map
 assets/built/main.js
 assets/built/main.js.map
 assets/built/screen.css
 assets/built/screen.css.map
 assets/css/global.css
 assets/css/screen.css
 assets/js/main.js
 custom-blog.hbs
 custom-post-with-sidebar.hbs
 ...h-table-of-contents-at-the-top-plus-sidebar.hbs
 custom-post-with-table-of-contents-at-the-top.hbs
 custom-post-with-table-of-contents.hbs
 custom-post-with-title-up.hbs
 default.hbs
 locales/en.json
 package.json
 partials/article-byline.hbs
 partials/blog-card.hbs
 partials/progress-bar.hbs
 partials/script-dropdown.hbs
 partials/section-blog.hbs
 partials/sidebar.hbs
 partials/widget-pages.hbs
 post.hbs
Siskin 1.1.1
Update date: 25.8.2022
- Fixed Issues with newsletter forms - success/error messages will now appear correctly.
- Fixed Several minor styling issues
Modified: assets/built/screen.css
Modified: assets/built/screen.css.map
Modified: assets/css/screen.css
Modified: custom-newsletter.hbs
Modified: locales/en.json
Modified: package.json
Modified: partials/section-newsletter.hbs
Modified: custom-post-with-sidebar.hbs
Siskin 1.1.0
Update date: 18.8.2022
- Added Table of contents page template - you can now have posts with a table of contents.
- Added Post with sidebar page template - you can now have a post with sidebar
- Added 3 custom widgets for the new sidebar post template (list tags, ads widget, and subscribe list widget)
- Added Newsletter page template - you can now list your newsletters and create a separate page for this as a landing page.
- Added Posts now support Ghost comments.
- Fixed Several minor styling issues
Modified: assets/css/screen.css
Added: custom-post-with-sidebar.hbs
Modified: partials/section-benefits.hbs
Added: partials/sidebar.hbs
Added: partials/widget-ads.hbs
Added: partials/widget-subscribe.hbs
Added: partials/widget-tags.hbs
Added: assets/built/main-min.js
Modified: assets/built/main.js
Added: custom-newsletter.hbs
Modified: default.hbs
Modified: gulpfile.js
Modified: package.json
Modified: post.hbs
Siskin 1.0
Initial release date: 14.7.2022
Initial release