Beak Ghost Theme Documentation
Welcome to the Beak - Ghost Newsletter Theme documentation by Iris Themes.
If you're having an issue and can't find the answer here, please contact us, and we will try to answer as soon as possible.
If you have an idea or a suggestion, feel free to suggest any new features you may want in this theme, and we will consider adding them for the following updates. Once you purchase this theme, you can access all upcoming theme updates.
Theme Info
Theme name: Beak
Theme Developer: Iris Themes
Version: 1.0.0
Description: Ghost Newsletter Theme
Latest update: 22.11.2022
Requirements
Ghost version: 4.0.0 or higher
Ghost Content API: v4
How do I install the Beak Ghost theme?
- Make sure that you are logged into your publication at yourawesomeblog.com/ghost/signin
- Go to Settings → Design
- Under Change Theme, click Upload theme
- Click inside the upload box to select a beak.zip, or drag and drop the beak.zip into the upload box.
- If you want to activate the theme immediately, click Activate Now or Close if you will do it later.
Theme Settings
Setting up the website
If you want to have an exact setup like on the Beak demo page, you need to do the following:
- Please create a page named Home and assign a Home page template to it
- Create tags Newsletter and Resources
- Please create a page called Newsletter and give a Newsletter page template to it
- Please create a page named Resources and assign a Resources page template to it
- Make sure that you have exact routes.yaml like
A tag called Newsletter is used to group newsletter publications and list them on the Newsletter page.
- The " Resources " label is used to group resources and list them on the Resources page.
Home Page
- Make sure that you are logged into your publication at yourawesomeblog.com/ghost/signin
- Make sure that the Beak theme is installed and activated
- Go to Settings → Design. Here you will find Home Page options
The home page contains several sections:
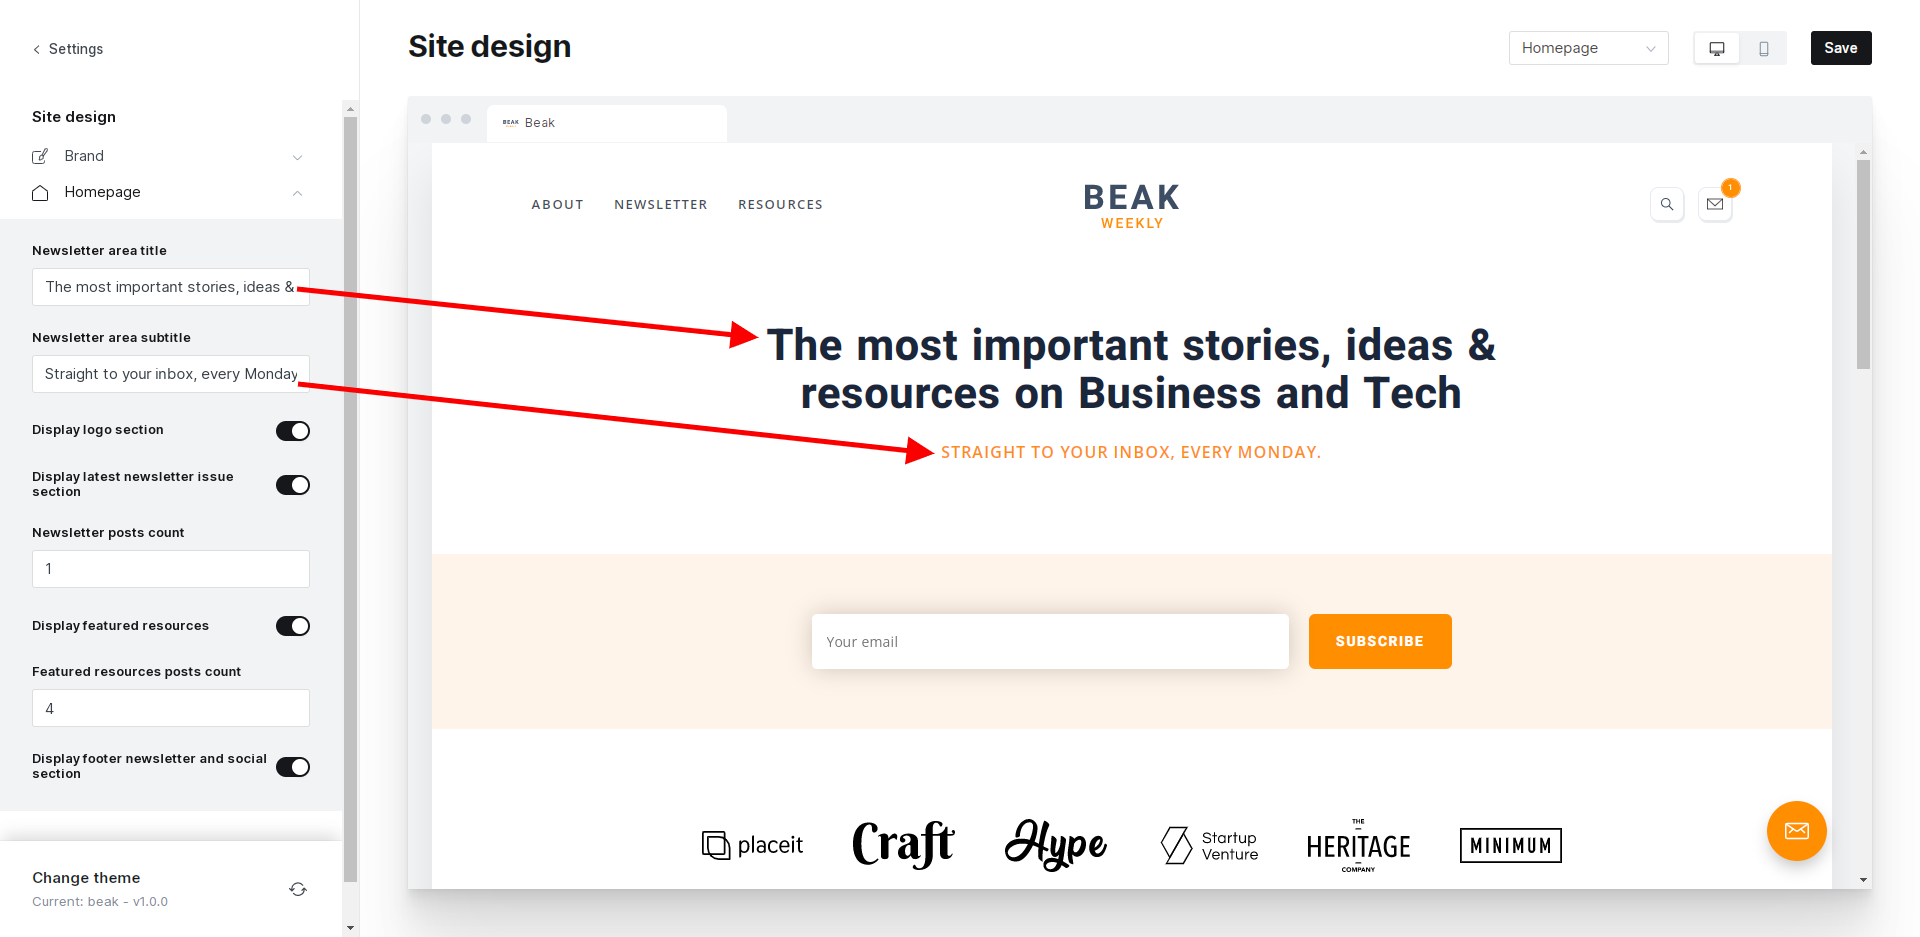
- Newsletter section - this is where your newsletter form is displayed
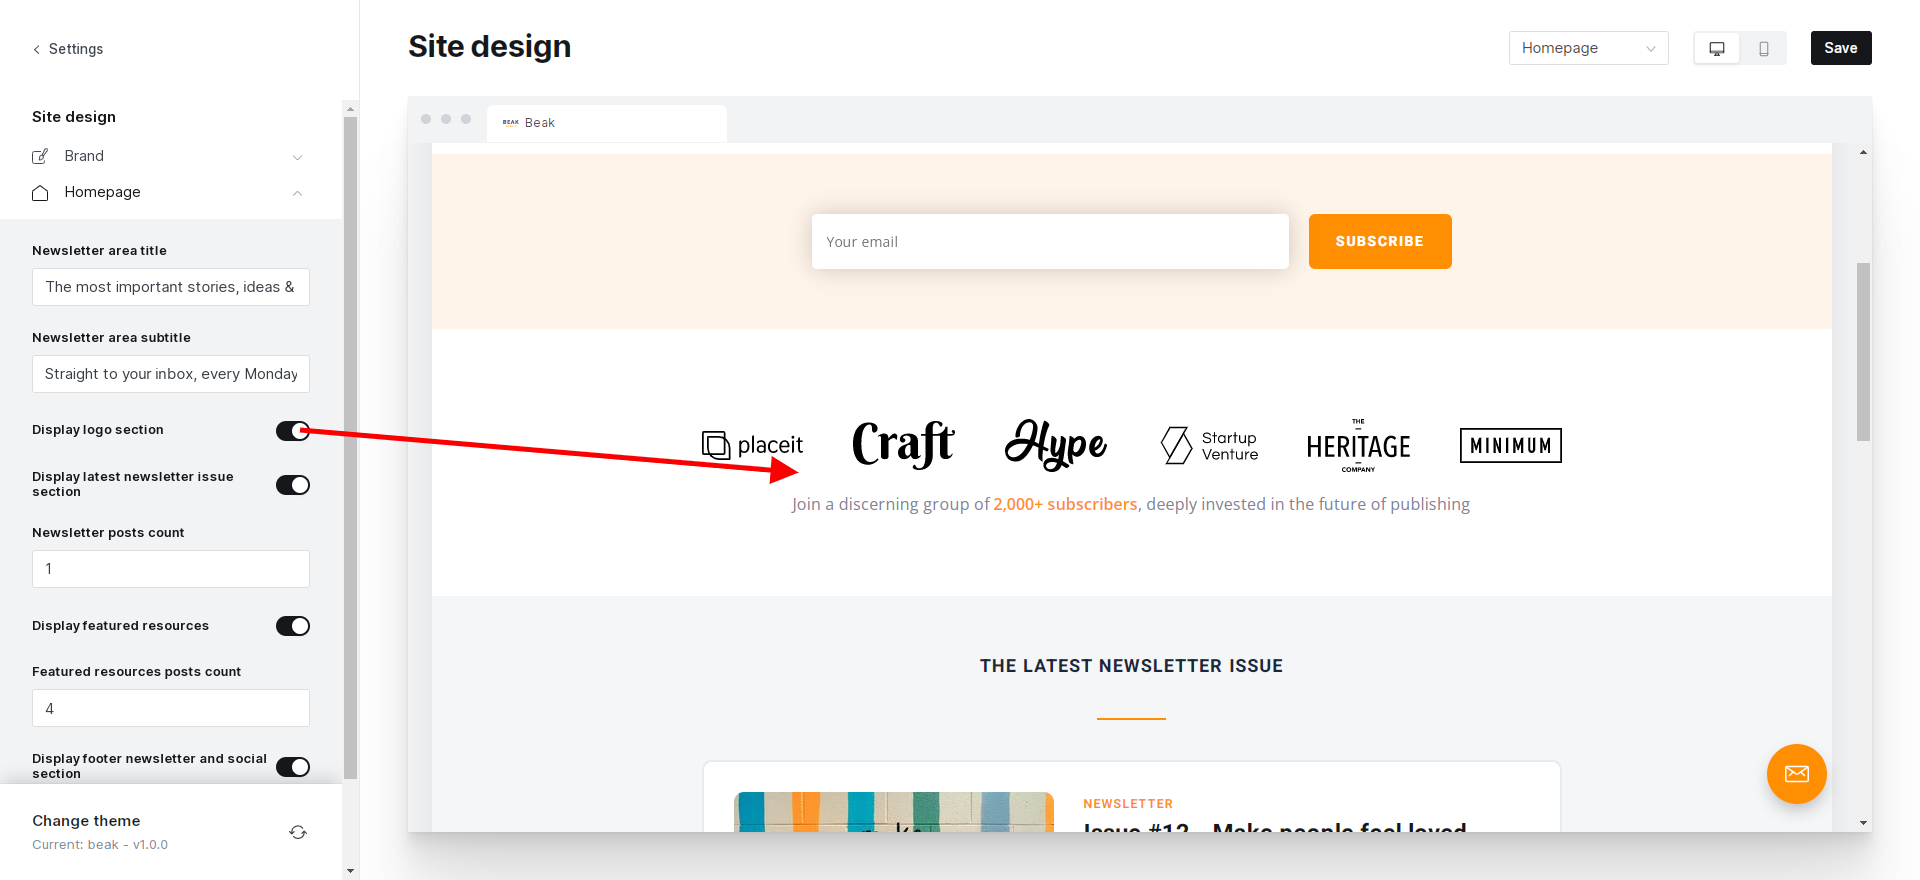
- Logos section - this is where logo images are displayed
- Newsletter post section - this is where featured latest newsletter posts are displayed
- Tools and resources section - this is where the list of featured resources is displayed
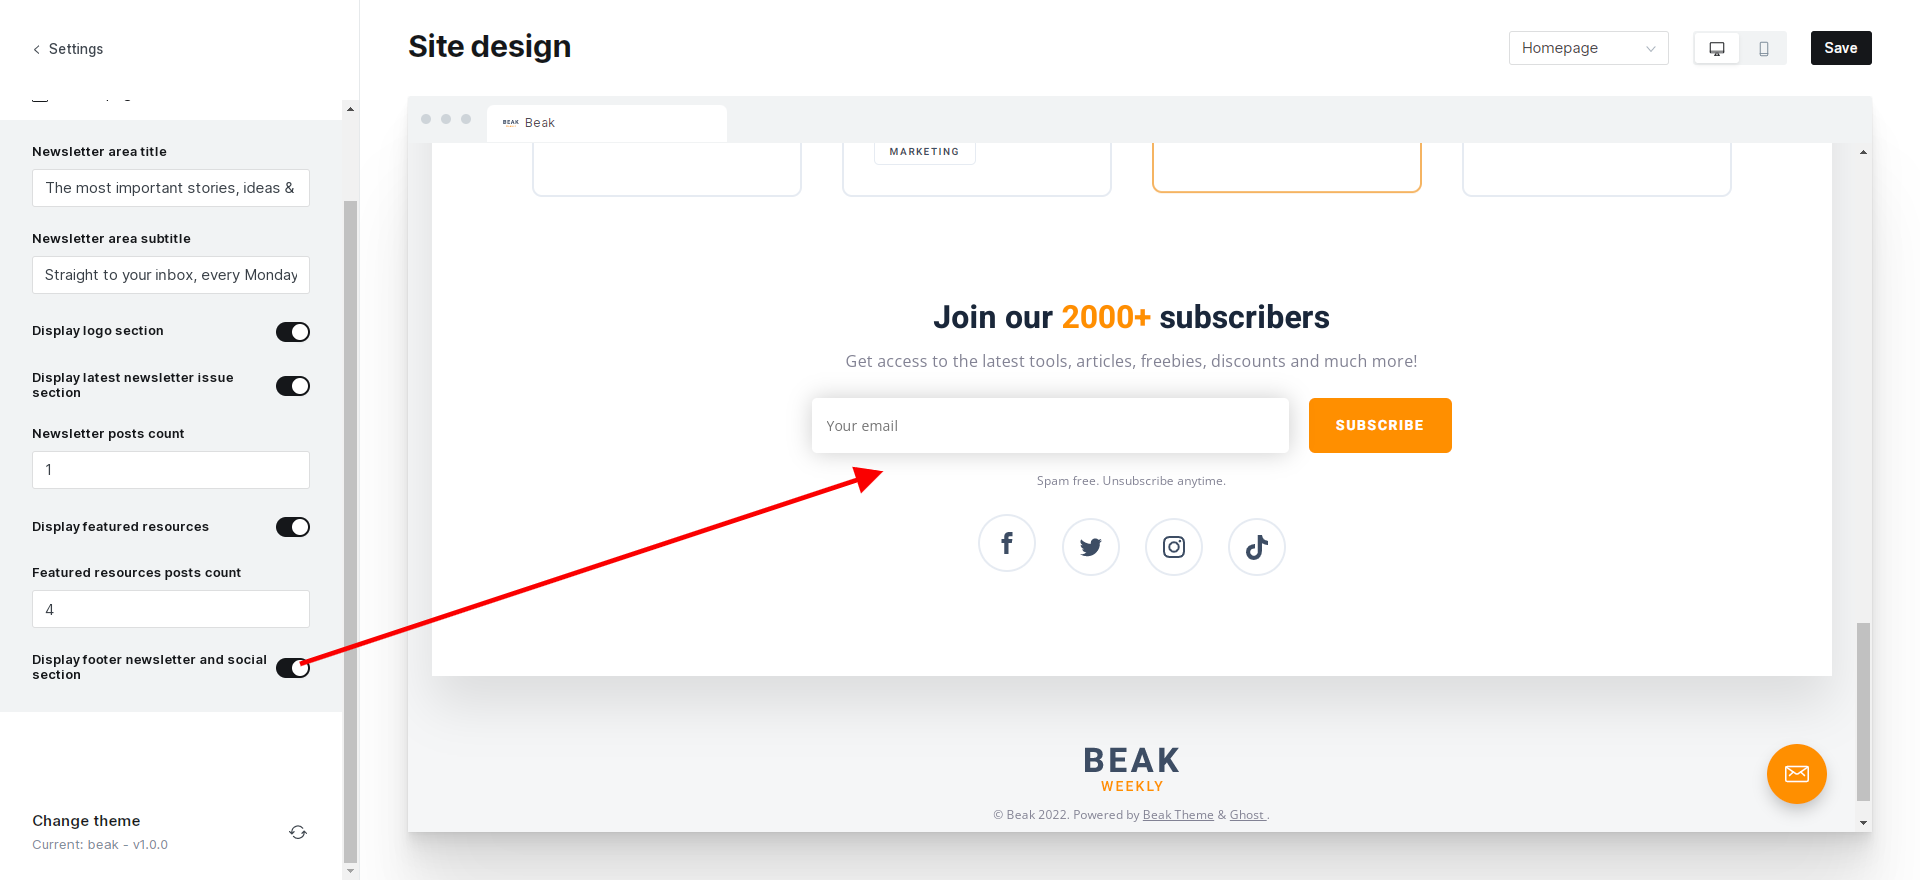
- Footer newsletter with social icons section - this is where a clean newsletter form with social icons is displayed
Newsletter section
You can edit the Ghost Newsletter section by navigating to Settings → Design → Homepage.
Logos section
You can hide the Logos section by navigating to Settings → Design → Homepage.
If you want to edit logo images on the home page, go to partials/section-logos.has file and edited the following lines of code.
<div id="beak-section-logos" class="beak-section-logos mb-8 mt-9">

    <div class="inner text-center">

    <div class="d-grid mt-8" data-cols="6" data-gap="5">
        <div class="grid-image-item text-center"><img class="m-auto" src="{{asset "img/logo-1.svg"}}" alt="Logo 1" /></div>
        <div class="grid-image-item text-center"><img class="m-auto" src="{{asset "img/logo-2.svg"}}" alt="Logo 2" /></div>
        <div class="grid-image-item text-center"><img class="m-auto" src="{{asset "img/logo-3.svg"}}" alt="Logo 3" /></div>
        <div class="grid-image-item text-center"><img class="m-auto" src="{{asset "img/logo-4.svg"}}" alt="Logo 4" /></div>
        <div class="grid-image-item text-center"><img class="m-auto" src="{{asset "img/logo-5.svg"}}" alt="Logo 5" /></div>
        <div class="grid-image-item text-center"><img class="m-auto" src="{{asset "img/logo-6.svg"}}" alt="Logo 6" /></div>
    </div>

    <p class="text-medium mt-2 text-color-meta">Join a discerning group of <span class="text-bold text-color-accent">2,000+ subscribers</span>, deeply invested in the future of publishing</p>

    </div>
</div>
Latest newsletter section
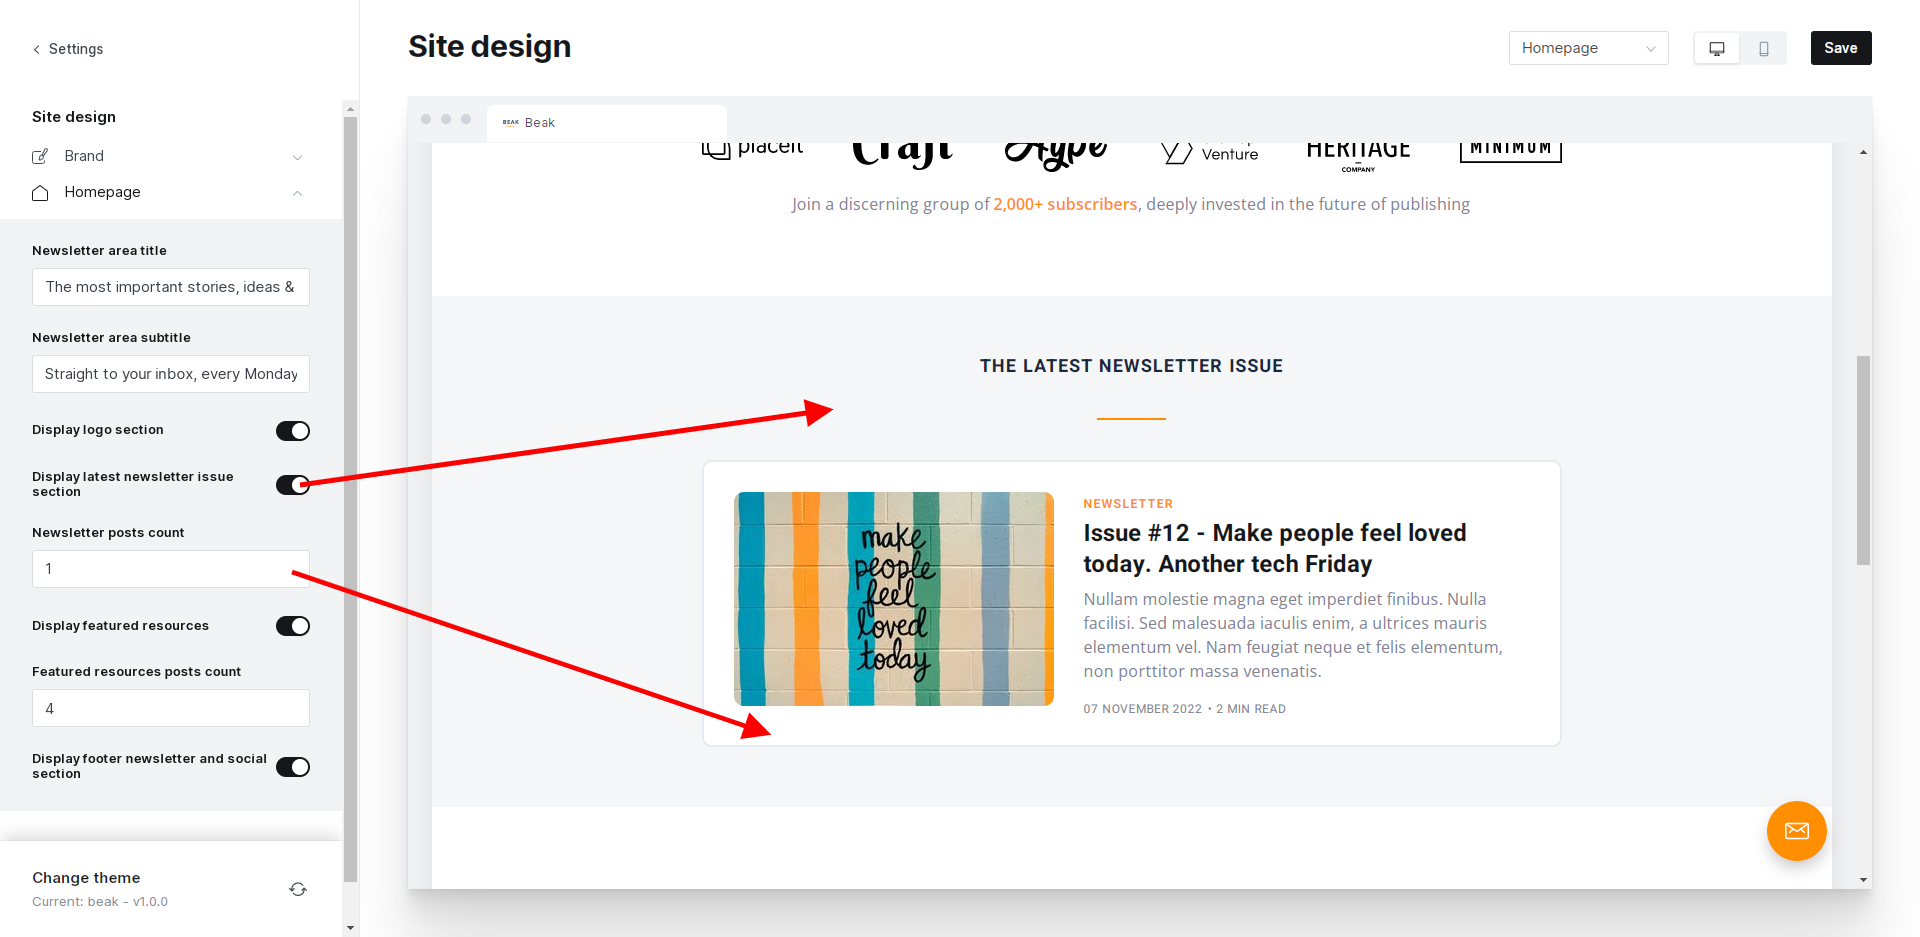
This area displays the latest posts in the previously set up Newsletter tag.
You can hide The Latest newsletter section by navigating to Settings → Design → Homepage.
You can also change the number of posts listed in this area.
Tools and Resources section
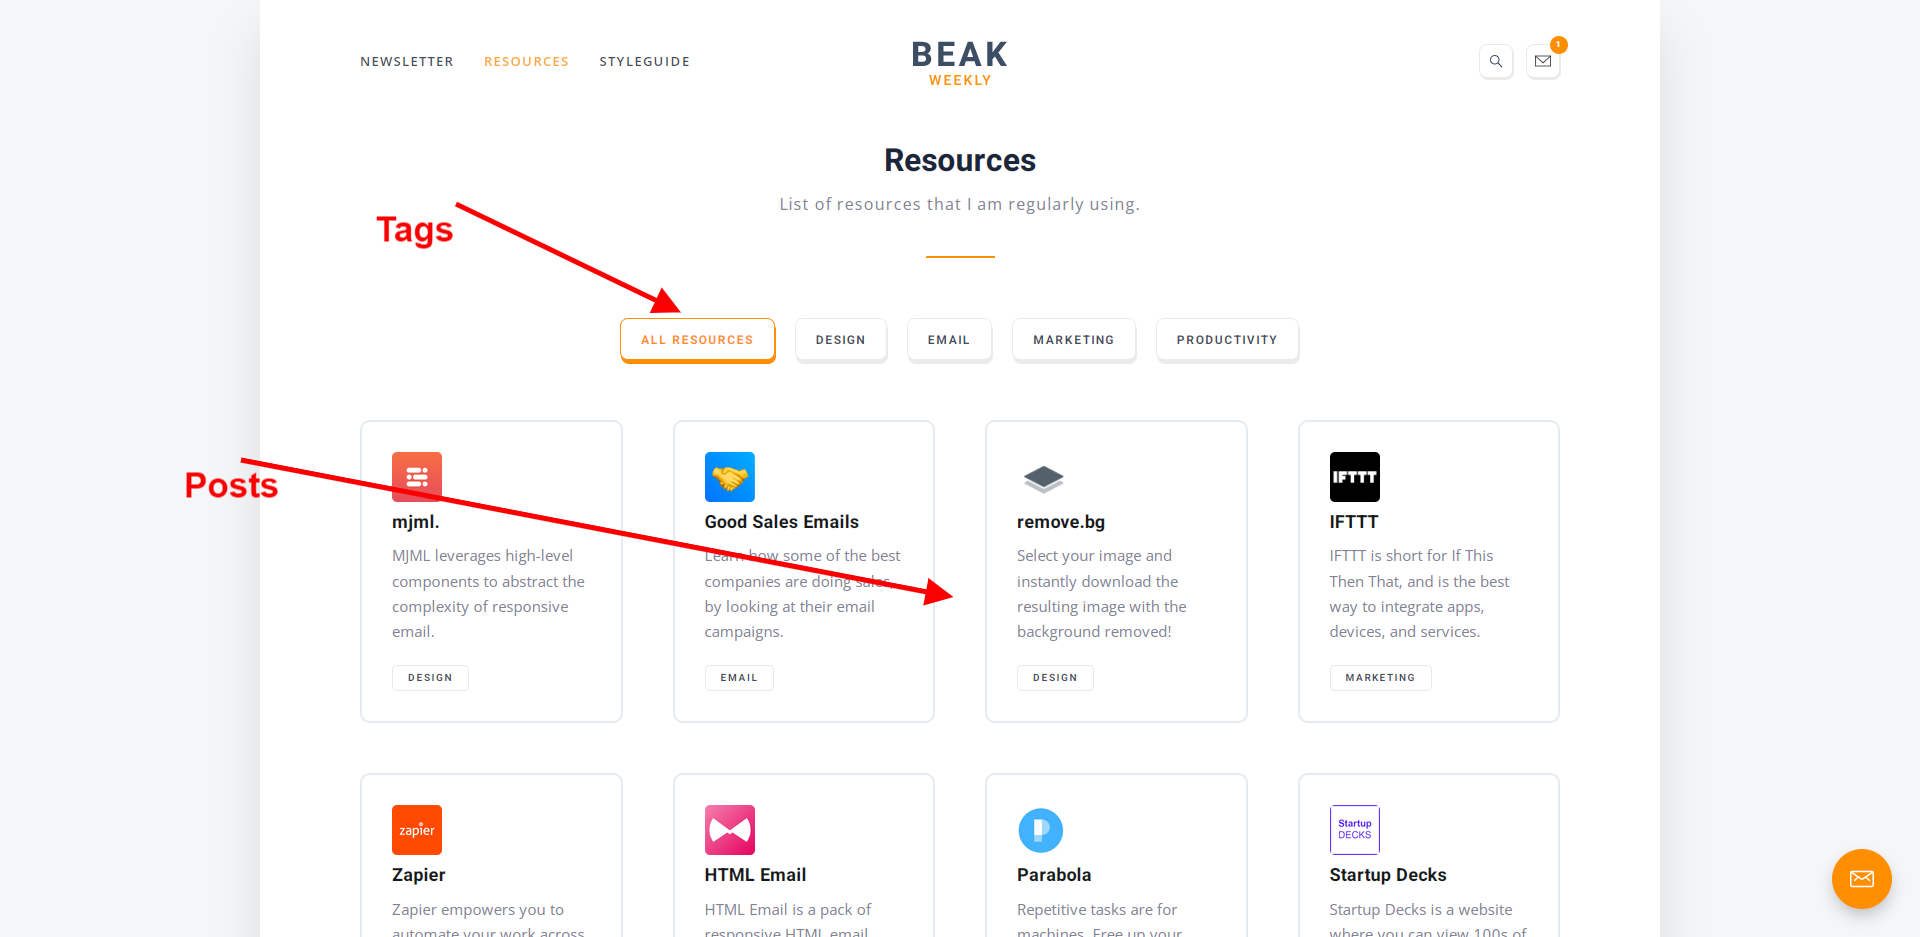
This area displays the featured posts previously set up via the Resources tag.
You can hide The Tools and Resources section by navigating to Settings → Design → Homepage.
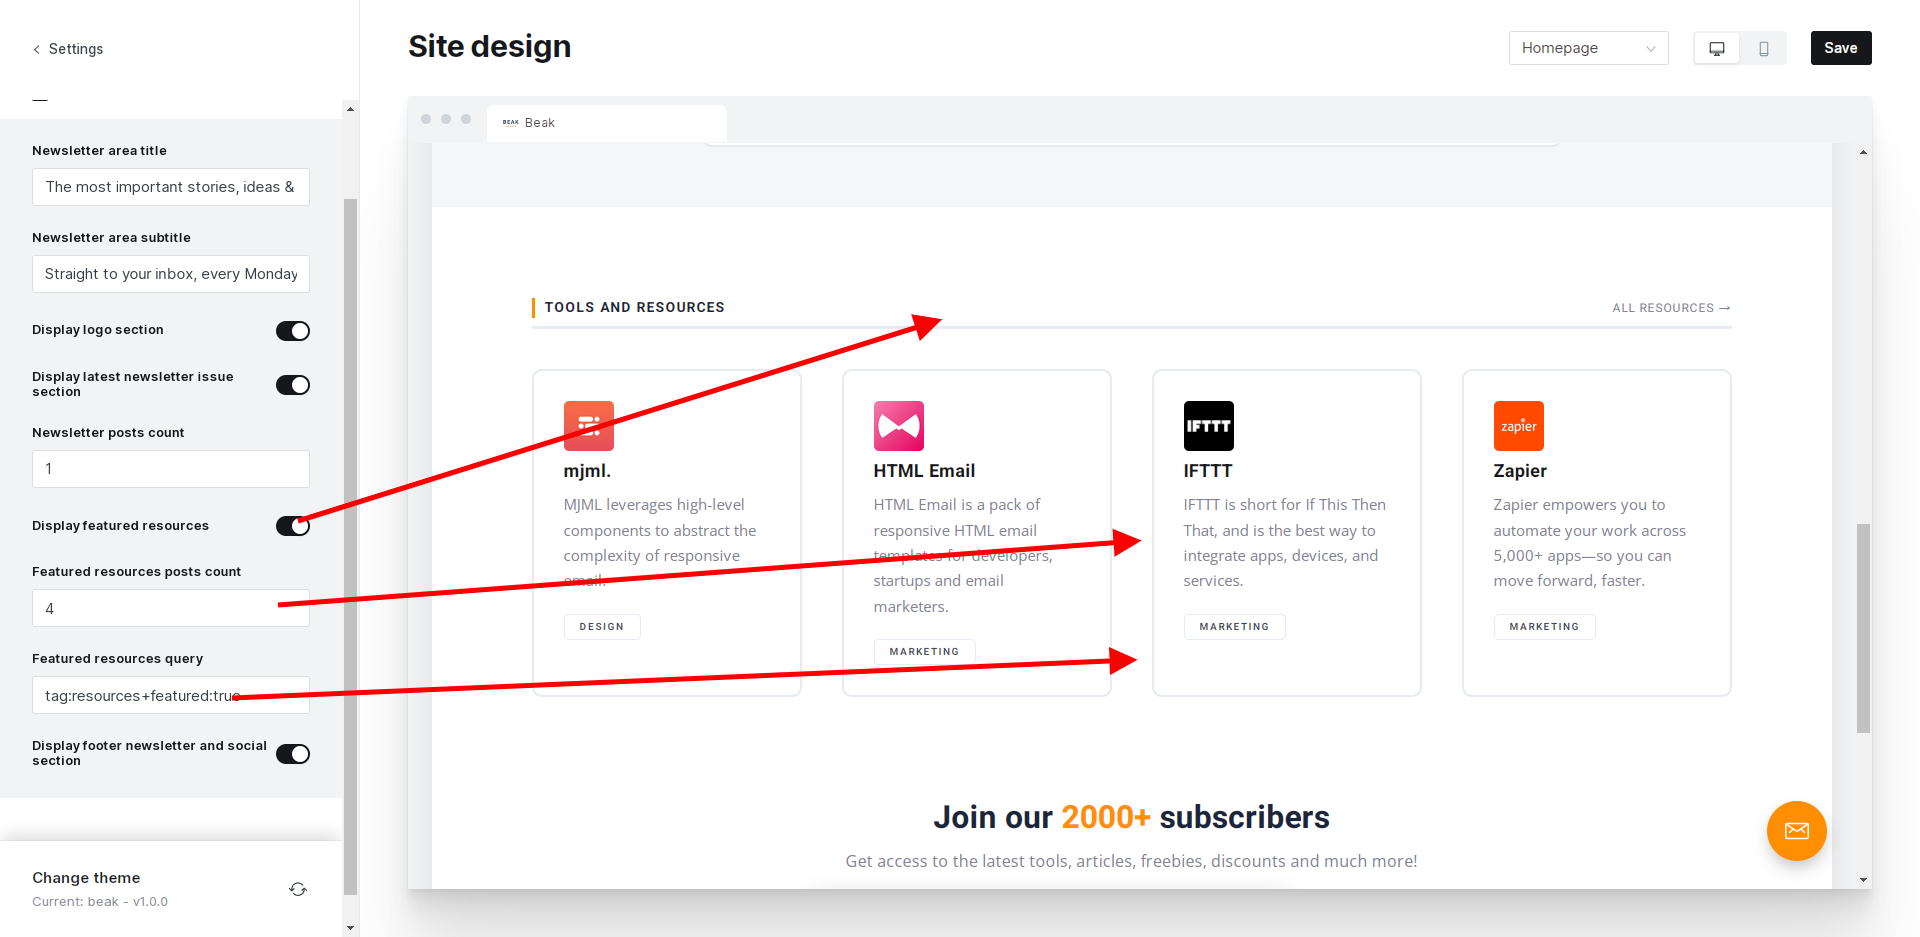
You can also change the number of posts listed in this area.
How to list posts (resources) on the Homepage?
- Create a post, and name it - for example, tag it with Design and Resources.
- Click the Feature this Post option.
- A post needs to have an assigned tag, Resources, because this slug selects posts in the templates.
- You can use Filter expressions to filter tags in this section additionally.
Newsletter section with social icons
You can edit the Newsletter section by navigating to Settings → Design → Homepage.
Newsletter
Beak theme comes with a custom newsletter page template where you can list all your newsletters and previous Newsletter releases.
Creating a newsletter page
- Create a page named Newsletter Page → New
- Pick the Newsletter page template
- Click save
- Posts from the tag "Newsletter" will be listed
Adding newsletter category and posts
- Go to Tags → New tag
- Name the tag "Newsletter".
- Click save
- Assign the tag or create a new post with the "Newsletter" tag
- Click Publish.
- Newsletter posts should be listed on the newsletter page template and the newsletter tag page.
Resources
The concept of tools and resources inside the Beak theme is meant to list useful resources you can recommend to your visitors. You can use this to list tools and add your affiliate links.
In the resources demo, you will see that several tags are listed.
Beak theme comes with custom resources page template where you can list all your link recommendations.
Resources page basic concept
- Create a tag with the desired name - for example, Design and Resources
- Please create a new post and assign Design and Resources tags to it
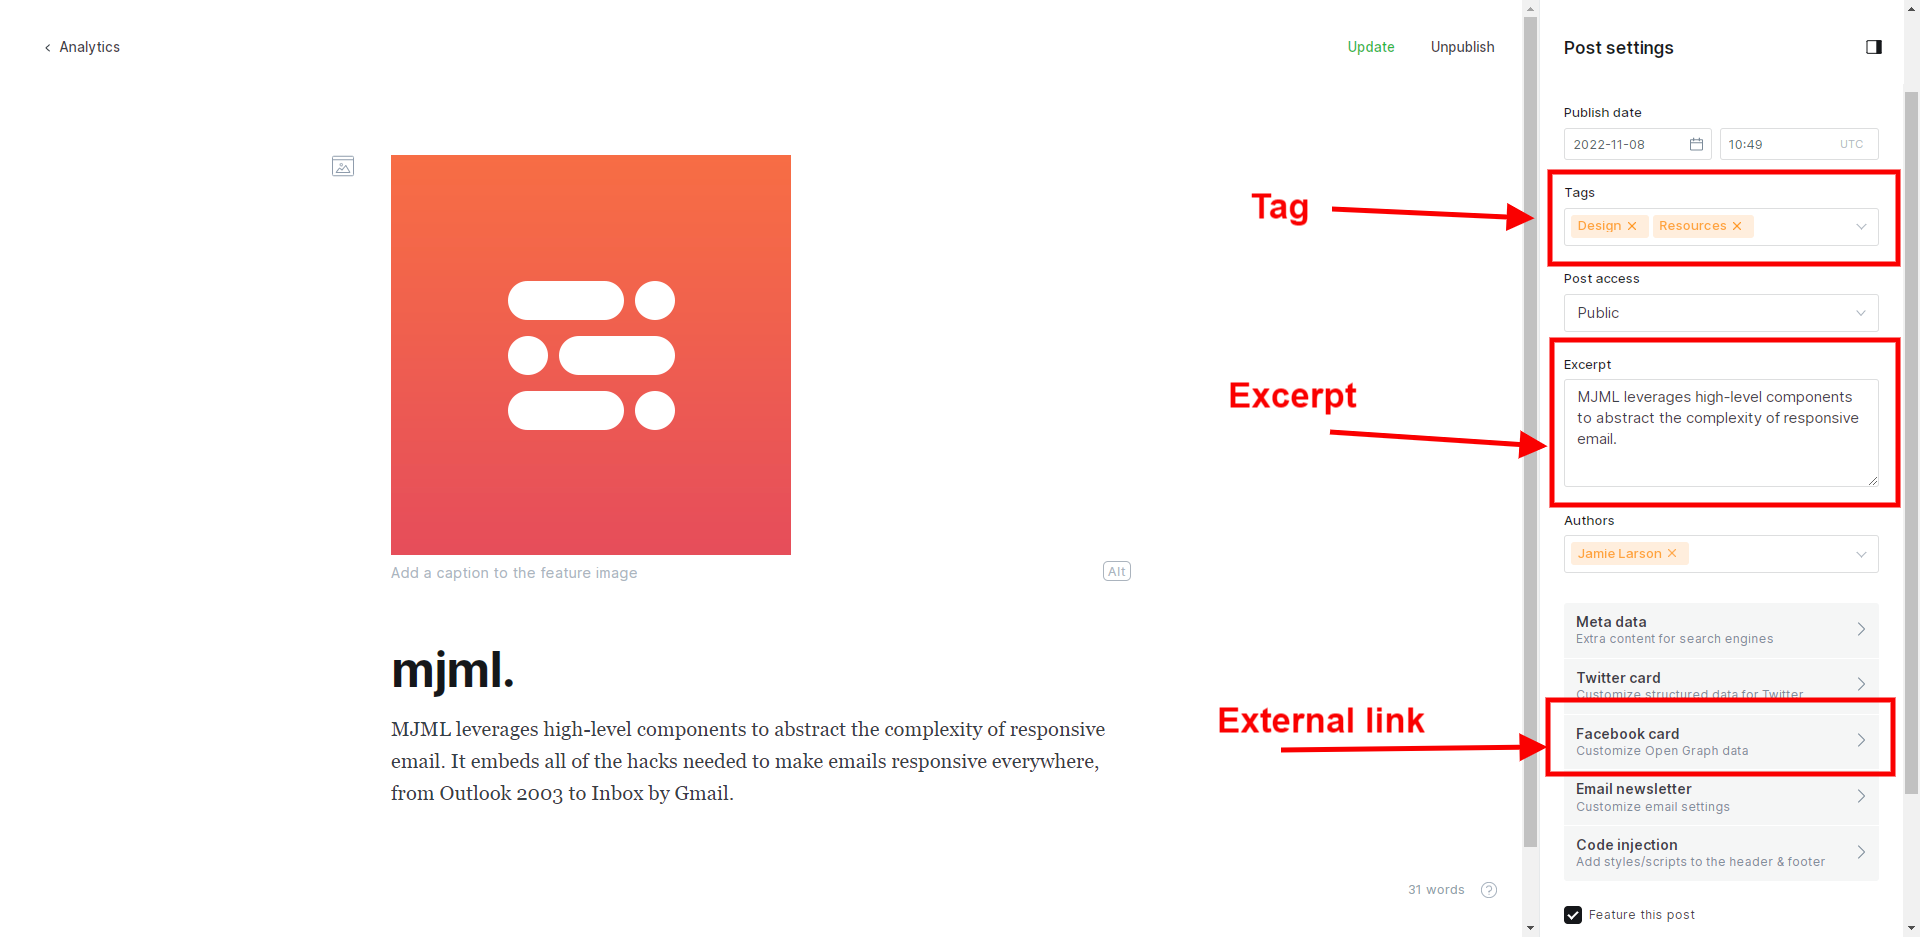
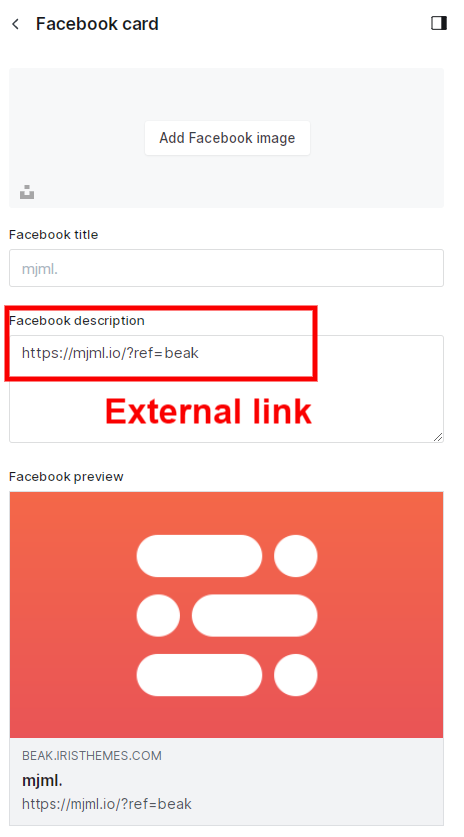
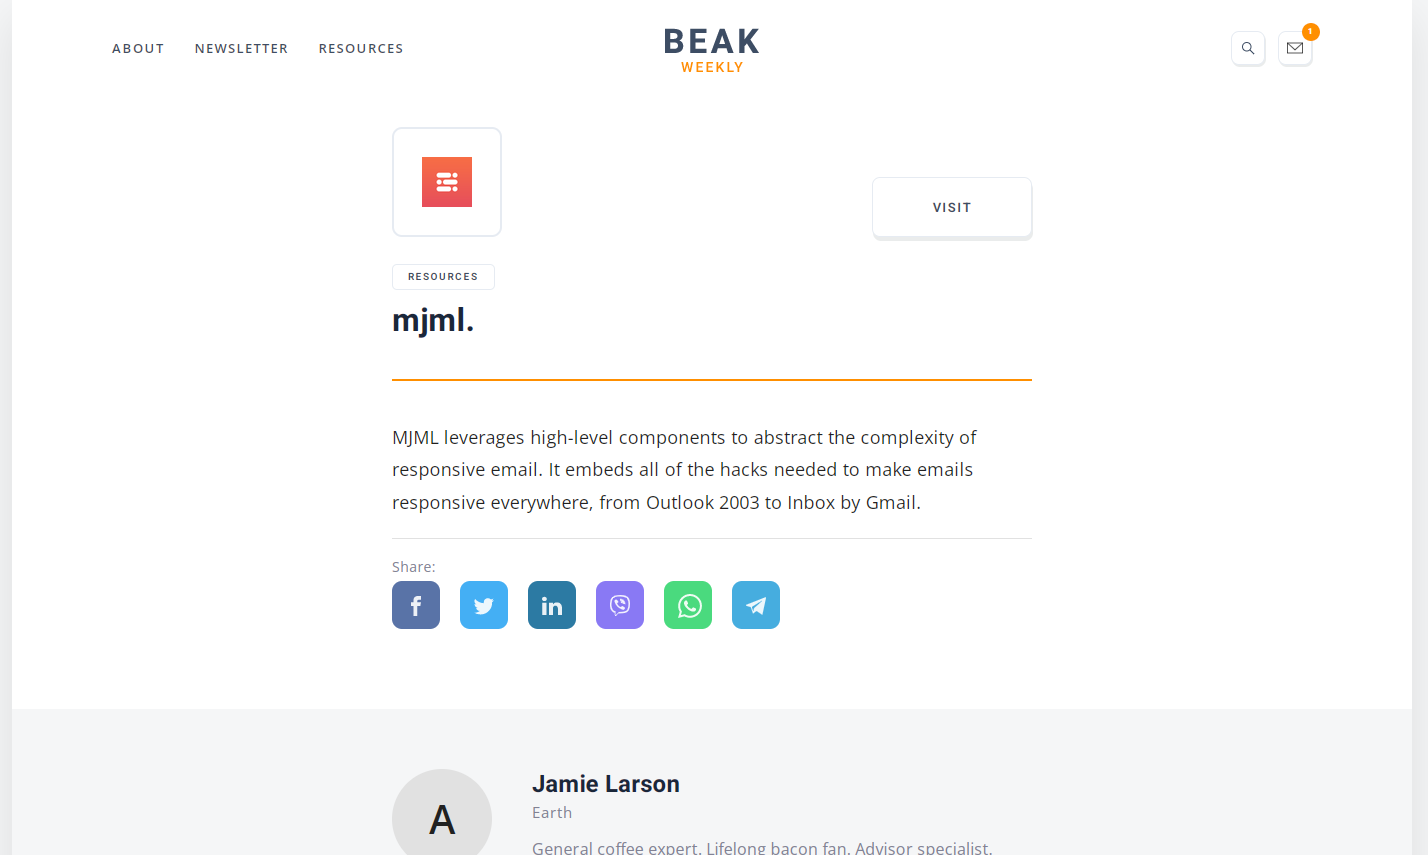
- You will notice that resource posts are cards leading to an external website.
- If you want to create a resource post leading to another website, add an external link to the Facebook card option.
You can use Post with a small image template if you want a nice single post.
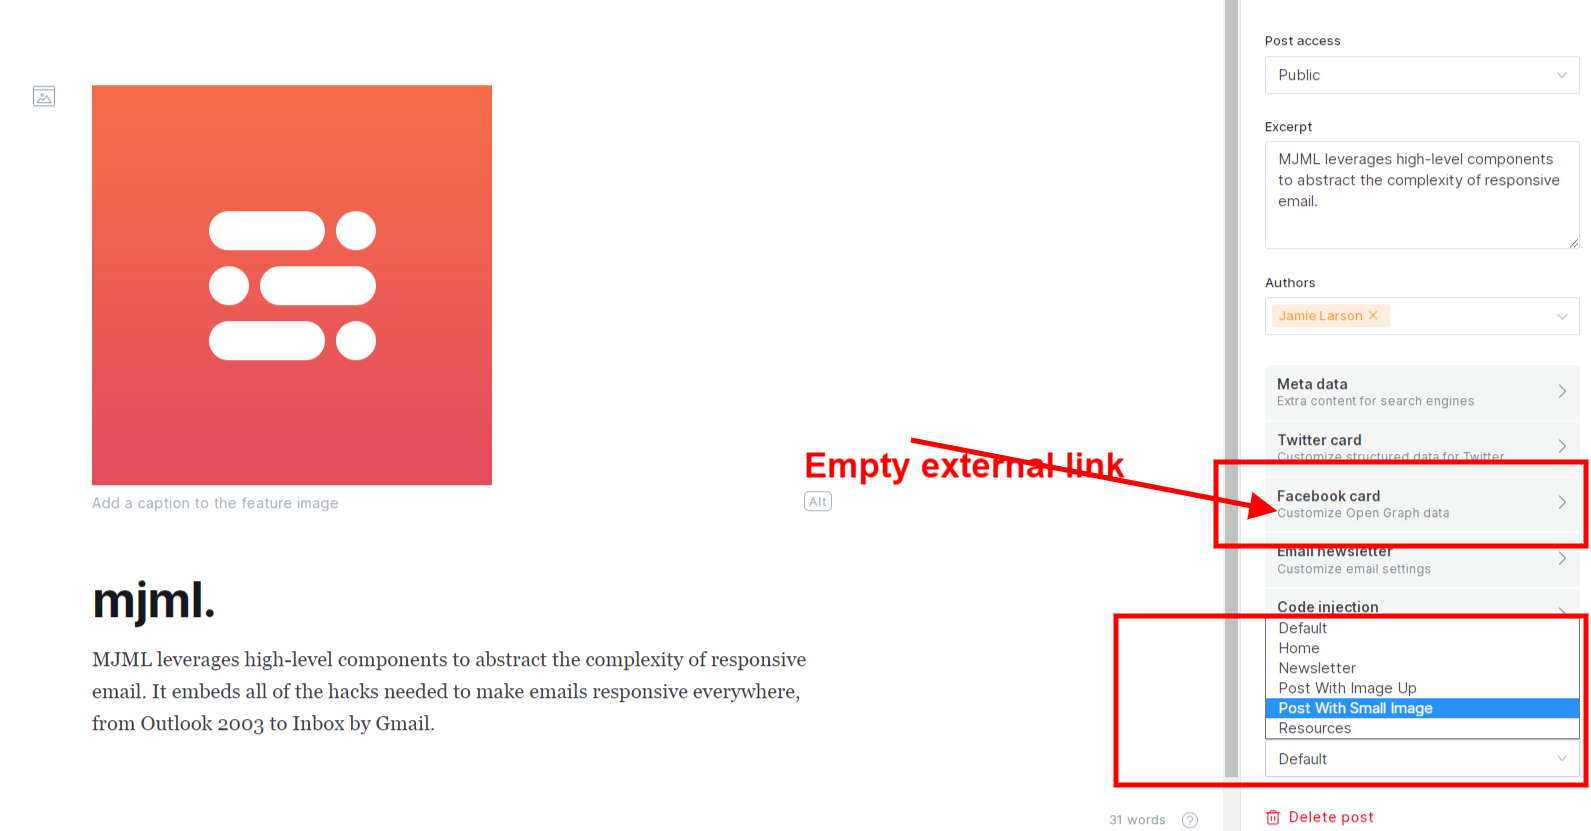
6. The result
Routes file explanation - tools and resources usage
- This creates an URL /resources where you can filter posts with the tag Design
  /resources/:
    controller: channel
    filter: tag:[design]
    template: custom-resources
    data: tag.resources
- This creates a collection with a URL /resources/design.
collections:
  /resources/design/:
    permalink: /resources/design/{slug}/
    filter: primary_tag:design
    template: custom-resources
    data: tag.design
Post
The Beak Ghost theme comes with several Single Post templates
- Regular single post template
- Post with the image above the title
- Post with small featured image - can be used for the resources single page
To change the desired Post template, go to Post → Edit and choose Post template from the template select box.
Page
Besides having posts, you can also create pages. For this:
- Make sure that you are logged into your publication at yourawesomeblog.com/ghost/signin
- Go to Pages.
- Click New page.
- Add the page title (which will be the slug/URL for the page as well).
- Add content for the page.
- Click Publish.
The Beak theme comes with several Single Page templates
- Regular single-page template
- Page with title below featured image
To change the desired Page template, go to Page → Edit and choose Page template from the template select box.
Icons
All the icons used inside the Beak theme are SVG icons. All the icons are located inside beak/partials/icons folder.
If you want to add or change icons, you can go to the SVG provider website, select the icon you want to add copy the code.
Find the desired icon that you want to change and open or create the icon.svg file; after this, all you need to do is to paste copied code.
<svg viewBox="0 0 24 24" xmlns="https://www.w3.org/2000/svg">
<g fill="none" fill-rule="evenodd">
<path d="M3.513 18.998C4.749 15.504 8.082 13 12 13s7.251 2.504 8.487 5.998C18.47 21.442 15.417 23 12 23s-6.47-1.558-8.487-4.002zM12 12c2.21 0 4-2.79 4-5s-1.79-4-4-4-4 1.79-4 4 1.79 5 4 5z" fill="#FFF"/>
</g>
</svg>
List of helpful SVG icons
Integrations
You can access Integrations in the admin section. Integrations can be used to connect built-in or custom functions to Ghost. How to create a custom integration:
- Log in to your publication admin section at yourawesomeblog.com/ghost/signin
- Click Settings > Integrations.
- Under Custom Integrations, click Add Custom integration
- Please provide a name for it
- Add description
- Content API Key is generated, which will be needed by the custom function to access Ghost data.
Contact
How to add a contact page
- Go to Pages → New page
- Name the page "Contact"
- Choose the default page template
- Choose to add a raw HTML card and go to https://formspree.io/library/simple-contact-form/
- Copy and paste simple HTML code with your formspree ID.
<form id="fs-frm" name="simple-contact-form" accept-charset="utf-8" action="https://formspree.io/f/{form_id}" method="post">
  <fieldset id="fs-frm-inputs">
    <label for="full-name">Full Name</label>
    <input type="text" name="name" id="full-name" placeholder="First and Last" required="">
    <label for="email-address">Email Address</label>
    <input type="email" name="_replyto" id="email-address" placeholder="[email protected]" required="">
    <label for="message">Message</label>
    <textarea rows="5" name="message" id="message" placeholder="Aenean lacinia bibendum nulla sed consectetur. Vivamus sagittis lacus vel augue laoreet rutrum faucibus dolor auctor. Donec ullamcorper nulla non metus auctor fringilla nullam quis risus." required=""></textarea>
    <input type="hidden" name="_subject" id="email-subject" value="Contact Form Submission">
  </fieldset>
  <input type="submit" value="Submit">
</form>
Routes
Routes settings
Beak uses basic routing, and if you want to have the same setup as on the demo website, you will need to do the following steps:
- Log in to your publication admin section at yourawesomeblog.com/ghost/signin
- Click Settings → Labs.
- Click on Download current routes.yaml to download existing routes file
- Open and edit existing routes.yaml file
- Upload routes.yaml file with a click on the "Upload routes YAML" button and select the file that you edited
Basic configuration for Beak theme demo:
Search
Search
From version 1.0 of the Beak Theme, there is implemented native Ghost search functionality.
All you need to do is to go to Settings → Navigation → Primary menu and add #/search to the URL label.
Theme Development
Like any other Ghost theme, Beak uses a simple templating language called Handlebars for its themes. The beak theme is developer friendly. If you need to make advanced customization, you will use the Gulp tasks for compiling Javascript and CSS Sass.
All the assets are minified and combined for better speed and performance. To make additional customizations, ensure you have Node.js and npm installed.
Here is a tutorial on How to install Ghost.
To install all the dependencies needed to make customizations to the theme inside the Beak theme folder, run the following command:
npm install
After installation is complete, you need to run the following:
gulp
You can always use Code Injection to do additional customizations. For example, if you want to change the text color of the theme, you can add the following code in the Blog Header section.
:root {

    /* Colors */
    --color-darkgrey: #35373A;
}
Beak theme uses Bootstrap for its initial layout and repeating classes. Core CSS files are located inside the assets/css folder. Beak theme uses Vanilla JS, so no necessary JS is included (jQuery, for example).
Ghost theme API documentation - which explains every possible Handlebars helper and template.
The main files are:
default.hbs- The main template fileindex.hbs- Used for the home page if you don't have routes filed addedpost.hbs- Used for individual postspage.hbs- Used for individual pagestag.hbs- Used for tag archivescustom-home.hbs- Used for home pagecustom-podcast.hbs- Used for podcast pagecustom-blog.hbs- Used for blog listing page
All the other parts of the theme are located inside partials the folder. You will find files prefixed with section - this means that they are the main file of one more significant section - like a Newsletter, for example.
Colors
To change the colors of the Beak theme, you need to look for assets/css/beak/assets/screen.css file.
:root {

    /* Colors */
    --color-darkgrey: #35373A;
    --color-midgrey: #cdd5d9;
    --color-lightgrey: #e1e1e1;
    --color-wash: #e5eff5;
    --color-darkmode: #151719;
    --color-dark: #151719;
    --color-white: #FFF;
    --color-softergrey: #fafafa;
    --color-text: #0a171c;
    --color-meta: rgba(21,23,25,0.6);

}
Here you can easily change the colors and then run gulp command to compile CSS files.
How to change the background color?
Here is a straightforward approach to how to change Beak's soft background color. First, paste this code into your Settings → Code injection page. Then, you can put it inside the head or footer section.
<style>
.bg-softaccent{
    background: rgba(220, 20, 60, 0.1);
}
</style>
How to change the background color?
Here is a straightforward approach to how to change Beak's soft background color. First, paste this code into your Settings → Code injection page. Then, you can put it inside the head or footer section.
<style>.bg-softaccent{ background: rgba(220, 20, 60, 0.1); } </style>
Changelog
Beak 1.0
Initial release date: 11.22.2022
Initial release